| |
New VERSION:
- No erratic robot movement any more!
- Simulation for Raspberry Pi based roboter (RaspiSim)
The source code of the library and all examples are included in the JGameGrid distribution.
The simulation also runs under Jython/Python (see here for more information)
RobotSim
A Simulation Package for the Lego EV3/NXT Robot
(JavaDoc)
Robot applications are usually executed software based before being tested on the robot itself. This not only saves time, but also cost. The software simulator should be designed that no or only few modifications of the simulation program is necessary to run it on the real machine. The standard Lego EV3/NXT robot is a moving robot for the educational environment using the Lego brick microcontroller, fixed on a gear with two motors. It can be equipped with several sensors, like touch sensors, light sensors, etc. The microcontroller can be programmed in different languages, among them Java. A wrapper library EV3JLib for the EV3 and NxtJLib for the NXT is available that is fully object oriented.
In the classroom a EV3/NXT simulator may be useful not only for demonstration of the robot application development but also if theare are not enough EV3/NXT bricks available for all students. Some years ago a NXT simulator application was developed at the college of education in Bern, Switzerland (PHBern). It is used frequently in Java learning classes all over the world. It is a part of the Java Online Learning System, developed at the informatics branch of PHBern, that may be accessed via www.java-online.ch (in German, some sessions are translated in English). This simulation is limited to Lego bricks using two touch sensors. A somewhat more general simulation packages RobotSim is presented here. It is based on the JGameGrid game development framework and the source code of the package is made public to be studied and modified by the users. The design follows the EV3JLib/NxtJLib package closely for the EV3/NXT brick in remote control mode and the EV3JLibA/NxtJLibA package for the EV3/NXT brick in autonomous mode (see).
The core class LegoRobot has a very clean and simple public interface but does most of the work using a private inner class Nxt that extends Actor. As in EV3JLib/NxtJLib, touch and light sensors are derived from the abstract class Part that extends Actor too. The robot's playground is a GameGrid instance with one-pixel resolution which is a private instance variable of LegoRobot. This design hides most of the underlying JGameGrid package and, for basic simulations, the student does not need any knowledge of JGameGrid. To fully understand the possibilities of the RobotSim, take a look at the applications displayed below. The first one is the most elementary application which simply creates a robot with two motors moving it by rotating the motors forward and backward.
|
import ch.aplu.robotsim.*;
public class SimEx1
{
public SimEx1()
{
LegoRobot robot = new LegoRobot();
Motor motA = new Motor(MotorPort.A);
Motor motB = new Motor(MotorPort.B);
robot.addPart(motA);
robot.addPart(motB);
motA.forward();
motB.forward();
Tools.delay(2000);
motA.stop();
Tools.delay(2000);
motB.stop();
Tools.delay(2000);
motA.backward();
motB.forward();
Tools.delay(2000);
motB.backward();
Tools.delay(2000);
robot.exit();
}
public static void main(String[] args)
{
new SimEx1();
}
} |
Execute the program locally using WebStart.
In the next example we use a Gear instance instead of two motors. This simplifies the program considerably. The movement commands forward(), left(), leftArc() etc. have two overloaded versions, one returns immediately while the movement continues, one with a time parameter that blocks until the end of the time interval and stops the robot movement.
Execute the program locally using WebStart.
|
import ch.aplu.robotsim.*;
public class SimEx2
{
public SimEx2()
{
LegoRobot robot = new LegoRobot();
Gear gear = new Gear();
robot.addPart(gear);
gear.forward();
Tools.delay(2000);
gear.left(2000);
gear.forward(2000);
gear.leftArc(0.2, 2000);
gear.forward(2000);
gear.leftArc(-0.2, 2000);
robot.exit();
}
public static void main(String[] args)
{
new SimEx2();
}
} |
Using a Logo-like turtle robot from the class TurtleRobot simplifies the program even more. No time parameter is needed to produce a given rotation angle. Keep in mind that due to rounding errors the angle has some inaccuracy that shows up in a long lasting movement.
|
import ch.aplu.robotsim.*;
public class SimEx3
{
public SimEx3()
{
TurtleRobot robot = new TurtleRobot();
for (int i = 0; i < 4; i++)
{
robot.forward(100);
robot.left(90);
}
robot.exit();
}
public static void main(String[] args)
{
new SimEx3();
}
}
|
Execute the program locally using WebStart.
Now we add sensors to the robot. These are modeled by subclasses of the Part class and must be "added" to the robot instance using the addPart() method. The sensor constructor takes a SensorPort reference that indicates where the sensor cable is plugged-in. In LegotSim it defines where the sensor is shown: SensorPort.S1 is shown at the robot front right side, SensorPort.S2 at the left side and SensorPort.S3 in the middle.
Sensors (touch sensors: pressed/released, light sensors the intensity level) may be polled or they may trigger an event (touch sensors: when pressed or released, light sensors when crossing a predefined trigger level from dark to bright or from bright to dark).
Since in reality constructing the obstacles is not part of the application, in RobotSim we perform the setup of the robot environment in a static block that may be easily deleted or commented out. The class RobotContext provides some useful static methods for setting up the environment and the start location/direction of the robot.
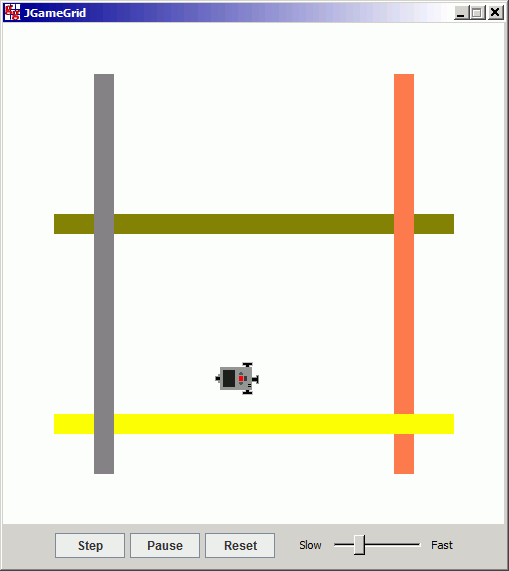
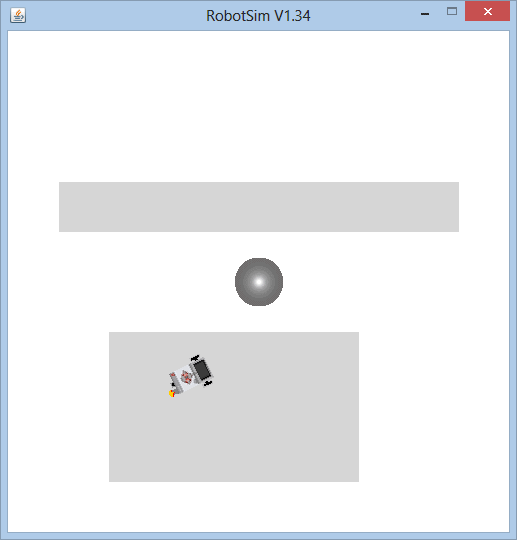
In the next examples four obstacles are shown (bars defining a rectangular area). The robot equipped with a touch sensor moves back and turns if the touch sensor is pressed. The standard JGameGrid navigation area is shown and it allows the developer to pause or execute the simulation in single steps. Increasing the simulation speed may cause troubles, because the obstacles may be missed.
|
import ch.aplu.robotsim.*;
public class SimEx4
{
static
{
RobotContext.showNavigationBar();
RobotContext.useObstacle("sprites/bar0.gif", 250, 200);
RobotContext.useObstacle("sprites/bar1.gif", 400, 250);
RobotContext.useObstacle("sprites/bar2.gif", 250, 400);
RobotContext.useObstacle("sprites/bar3.gif", 100, 250);
}
public SimEx4()
{
LegoRobot robot = new LegoRobot();
Gear gear = new Gear();
TouchSensor ts = new TouchSensor(SensorPort.S3);
robot.addPart(gear);
robot.addPart(ts);
gear.setSpeed(30);
gear.forward();
while (true)
{
if (ts.isPressed())
{
gear.backward(1200);
gear.left(750);
gear.forward();
}
}
}
public static void main(String[] args)
{
new SimEx4();
}
} |
Execute the program locally using WebStart.
When the real robot touches an obstacle somewhere else than at its touch sensor, an unpredictable movement results, thus we cannot simulate what happens. We consider this an erroneous application that should be avoided. In RobotSim collisions between the robot image and a obstacle produce an event and an error message is displayed in the window's title bar. This happens in the last example when the backward() time parameter is reduced to 600 ms.
Execute the program locally using WebStart.
The analogous program using events implements a TouchListener and declares the pressed() and released() callback methods.
import ch.aplu.robotsim.*;
public class SimEx5 implements TouchListener
{
static
{
RobotContext.showNavigationBar();
RobotContext.useObstacle("sprites/bar0.gif", 250, 200);
RobotContext.useObstacle("sprites/bar1.gif", 400, 250);
RobotContext.useObstacle("sprites/bar2.gif", 250, 400);
RobotContext.useObstacle("sprites/bar3.gif", 100, 250);
}
private Gear gear = new Gear();
public SimEx5()
{
LegoRobot robot = new LegoRobot();
TouchSensor ts = new TouchSensor(SensorPort.S3);
robot.addPart(gear);
robot.addPart(ts);
ts.addTouchListener(this);
gear.setSpeed(30);
gear.forward();
}
public void pressed(SensorPort port)
{
gear.backward(1200);
gear.left(750);
gear.forward();
}
public void released(SensorPort port)
{
}
public static void main(String[] args)
{
new SimEx5();
}
}
|
Execute the program locally using WebStart.
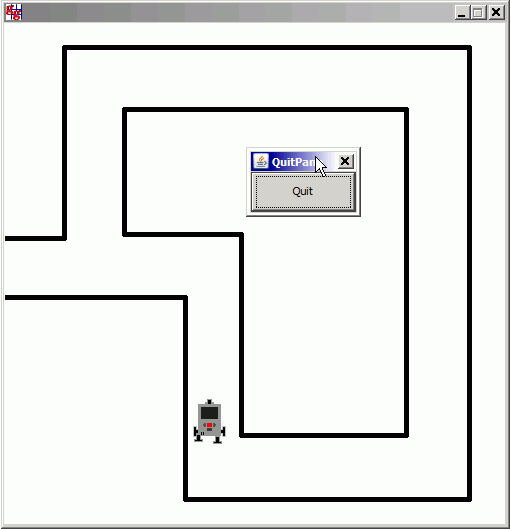
In the well-known channel robot application, the robot has two touch sensors and must find its way through a channel. Depending the shape of the channel, it may be blocked or even forced to turn around. It is a tricky and interesting task to find an algorithm that works with different channels. The RobotSim package includes a few predefined obstacles that may be displayed using RobotContext.useObstacle().
It is a bad design to use endless loops. For real robots in direct mode, normally a QuitPane is used to stop the program, in autonomous mode the program should be terminated gracefully using a button click. When polling in a loop, slow down the poll period using Tool.delay(), otherwise you waste a lot of CPU time and a slower computer may get blocked. Below we simulate a channel robot for the direct mode using a very simple algorithm that does not work in every case.
import ch.aplu.robotsim.*;
import ch.aplu.util.*;
public class SimEx6
{
static
{
RobotContext.setLocation(10, 10);
RobotContext.setStartDirection(5);
RobotContext.setStartPosition(100, 240);
RobotContext.useObstacle(RobotContext.channel);
}
public SimEx6()
{
LegoRobot robot = new LegoRobot();
Gear gear = new Gear();
robot.addPart(gear);
TouchSensor ts1 = new TouchSensor(SensorPort.S1); // right sensor
TouchSensor ts2 = new TouchSensor(SensorPort.S2); // left sensor
robot.addPart(ts1);
robot.addPart(ts2);
gear.forward();
while (!QuitPane.quit())
{
boolean t1 = ts1.isPressed();
boolean t2 = ts2.isPressed();
if (t1 && t2)
{
gear.backward(500);
gear.left(400);
gear.forward();
}
else
{
if (t1)
{
gear.backward(500);
gear.left(400);
gear.forward();
}
else
{
if (t2)
{
gear.backward(500);
gear.right(100);
gear.forward();
}
}
}
Tools.delay(20);
}
robot.exit();
}
static public void main(String[] args)
{
new SimEx6();
}
} |
Execute the program locally using WebStart.
The next example introduces to light sensors that measures the intensity of light falling on a small spot (2-3 mm diameter) of a photo diode. In the class LightSensor the spot is just one pixel wide and reports the intensity (in the HSB color model (see relationship between RGB and HSB) scaled to 0..1000) of the background pixel at this specific point. A light sensor may be polled to get the current light level or a LightListener may be registered and callback methods bright() and dark() implemented that are called when the light level crosses a given trigger value. Like with TouchSensor, the sensor constructor takes a SensorPort reference that indicates where the sensor cable is plugged-in. In RobotSim it defines where the sensor is shown: SensorPort.S1 is shown at the robot front right side, SensorPort.S2 at the left side and SensorPort.S3 in the middle.
In many standard EV3/NXT examples the light sensor is mounted to detect the reflected light from the floor where dark or bright areas are drawn. In RobotSim the GGBackground of the underlying GameGrid is used, so some minor knowledge of how to draw a background image is necessary. In order to separate this setup code from the rest of the program that should compile and be run on the real robot, the code can be put into a static method _init() that is automatically called by the constructor of LegoRobot. By deleting or commenting out this method, the code should compile for the real robot in direct or autonomous mode.
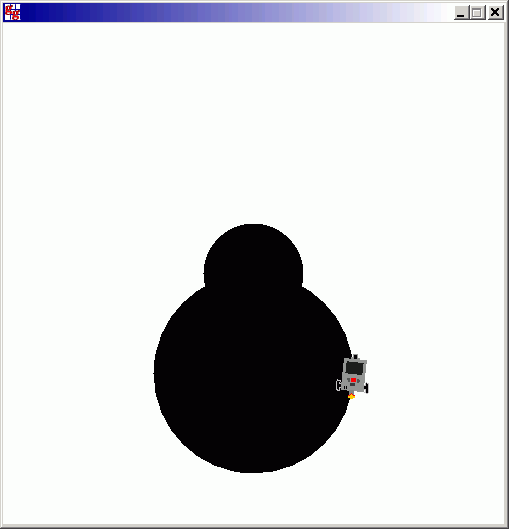
In the following example the robot should follow the border of a black area. The program is event driven and the callback methods makes the robot move on a right or left circle.
import ch.aplu.robotsim.*;
import ch.aplu.jgamegrid.*;
import java.awt.*;
public class SimEx7 implements LightListener
{
private Gear gear = new Gear();
public SimEx7()
{
LegoRobot robot = new LegoRobot();
LightSensor ls = new LightSensor(SensorPort.S3);
robot.addPart(gear);
robot.addPart(ls);
ls.addLightListener(this, 500);
gear.forward();
}
public void bright(SensorPort port, int level)
{
gear.rightArc(0.15);
}
public void dark(SensorPort port, int level)
{
gear.leftArc(0.15);
}
public static void _init(GameGrid gg)
{
GGBackground bg = gg.getBg();
bg.setPaintColor(Color.black);
bg.fillArc(new Point(250, 250), 50, 0, 360);
bg.fillArc(new Point(250, 350), 100, 0, 360);
}
public static void main(String[] args)
{
new SimEx7();
}
} |
Execute the program locally using WebStart.
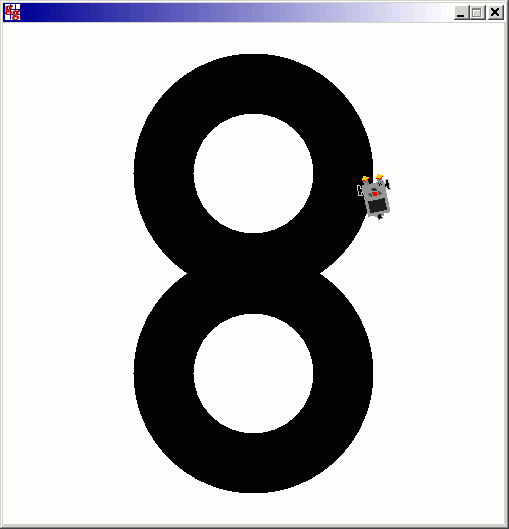
In the next example we simulate the classic "track follower" where the robot must move on a black track drawn on the floor. Because two sensors are used, it is better to poll the sensors than using events. The program is designed as state machine. It polls the two sensors repeatedly and switches the state accordingly. _init() draws two black rings representing the number 8.
import ch.aplu.robotsim.*;
import ch.aplu.jgamegrid.*;
import java.awt.*;
public class SimEx8()
{
static
{
RobotContext.setStartDirection(10);
}
private enum State
{
FORWARD, BACKWARD, LEFT, RIGHT
};
private State state = State.FORWARD;
public SimEx8()
{
LegoRobot robot = new LegoRobot();
Gear gear = new Gear();
LightSensor ls1 = new LightSensor(SensorPort.S1);
LightSensor ls2 = new LightSensor(SensorPort.S2);
robot.addPart(gear);
robot.addPart(ls1);
robot.addPart(ls2);
gear.forward();
int v = 500;
double r = 0.3;
while (true)
{
int v1 = ls1.getValue();
int v2 = ls2.getValue();
if (state != State.FORWARD && v1 < v && v2 < v)
{
state = State.FORWARD;
gear.forward();
}
if (state != State.RIGHT && v1 < v && v2 > v)
{
state = State.RIGHT;
gear.rightArc(r);
}
if (state != State.LEFT && v1 > v && v2 < v)
{
state = State.LEFT;
gear.leftArc(r);
}
if (state != State.BACKWARD && v1 > v && v2 > v)
{
state = State.BACKWARD;
gear.backward();
}
}
}
private static void _init(GameGrid gg)
{
GGBackground bg = gg.getBg();
bg.setPaintColor(Color.black);
bg.fillArc(new Point(250, 150), 120, 0, 360);
bg.setPaintColor(Color.white);
bg.fillArc(new Point(250, 150), 60, 0, 360);
bg.setPaintColor(Color.black);
bg.fillArc(new Point(250, 350), 120, 0, 360);
bg.setPaintColor(Color.white);
bg.fillArc(new Point(250, 350), 60, 0, 360);
}
public static void main(String[] args)
{
new SimEx8();
}
} |
Execute the program locally using WebStart.
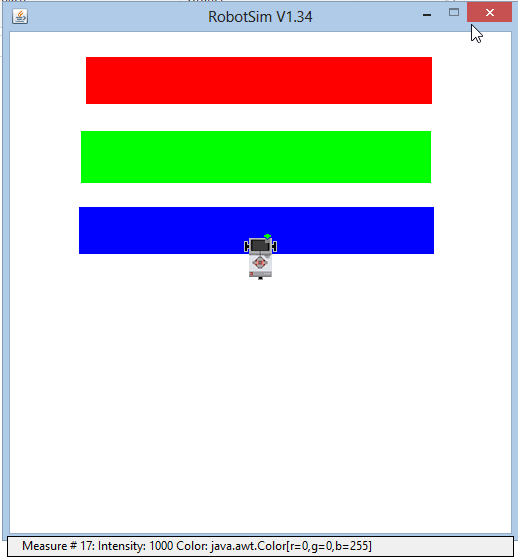
The color sensor is supported by reporting the color of the background under the color sensor position. The following example should convince you that all is working fine. It displays a status bar and System.out is automatically redirected there.
|
import ch.aplu.robotsim.*;
public class SimEx17
{
public SimEx17()
{
LegoRobot robot = new LegoRobot();
Gear gear = new Gear();
ColorSensor cs = new ColorSensor(SensorPort.S1);
robot.addPart(gear);
robot.addPart(cs);
gear.setSpeed(10);
gear.forward();
int n = 0;
while (true)
{
n++;
System.out.println("Measure # " + n
+ ": Intensity: " + cs.getLightValue()
+ " Color: " + cs.getColor());
Tools.delay(500);
}
}
public static void main(String[] args)
{
new SimEx17();
}
// ------------------ Environment --------------------------
static
{
RobotContext.setStartPosition(250, 300);
RobotContext.setStartDirection(-90);
RobotContext.useBackground("sprites/colorbar.gif");
RobotContext.showStatusBar(20);
}
}
|
Execute the program locally using WebStart.
You may use 4 light sensors directed in upward direction to construct a robot that follows obediently a moving light source like a torch in your hand. To simulate light sensors pointing upwards, an extra boolean parameter is used when constructing them. The torch is created in the RobotContext by useTorch(p, x, y, z). It is automatically enabled for mouse dragging. Any number of torches may be created. useTorch() takes the power p of the spot light, the x- and y-coordinates relative to the robot surface and the height z above the surface. The intensitiy is calculated by applying the 1 /r^2 light decrease law.
|
import ch.aplu.robotsim.*;
public class SimEx19
{
public SimEx19()
{
LegoRobot robot = new LegoRobot();
LightSensor lsFR = new LightSensor(SensorPort.S1, true);
LightSensor lsFL = new LightSensor(SensorPort.S2, true);
LightSensor lsRR = new LightSensor(SensorPort.S3, true);
LightSensor lsRL = new LightSensor(SensorPort.S4, true);
Gear gear = new Gear();
robot.addPart(gear);
robot.addPart(lsFR);
robot.addPart(lsFL);
robot.addPart(lsRL);
robot.addPart(lsRR);
gear.setSpeed(25);
gear.forward();
double s = 0.02;
while (!robot.isEscapeHit())
{
int vFR = lsFR.getValue();
int vFL = lsFL.getValue();
int vRR = lsRR.getValue();
int vRL = lsRL.getValue();
double d = 1.0 * (vFL - vFR) / (vFL + vFR);
if (vRL + vRR > vFL + vFR) // torch behind robot
gear.left();
else if (d > -s && d < s)
gear.forward();
else
{
if (d >= s)
gear.leftArc(0.05);
else
gear.rightArc(0.05);
}
Tools.delay(100);
}
robot.exit();
}
public static void main(String[] args)
{
new SimEx19();
}
// ------------------ Environment --------------------------
static
{
RobotContext.useTorch(1, 150, 250, 100);
}
}
|
Execute the program locally using WebStart.
You may even simulate shadow reagions, where no light is detected by calling useShadow(). When the robot enters a shadow region, the light sensor reports 0, as if all light is absorbed. In this example the light sensor is fixed at the rear of the robot and a sound is emitted when the robot enters or leaves the shadow region.
|
import ch.aplu.robotsim.*;
import java.awt.Color;
public class SimEx20
{
public SimEx20()
{
LegoRobot robot = new LegoRobot();
LightSensor ls = new LightSensor(SensorPort.S3, true);
robot.addPart(ls);
Gear gear = new Gear();
robot.addPart(gear);
gear.leftArc(0.5);
boolean isLightOn = false;
while (!robot.isEscapeHit())
{
int v = ls.getValue();
if (!isLightOn && v == 0)
{
isLightOn = true;
robot.playTone(2000, 100);
}
if (isLightOn && v > 0)
{
isLightOn = false;
robot.playTone(1000, 100);
}
Tools.delay(100);
}
robot.exit();
}
public static void main(String[] args)
{
new SimEx20();
}
// ------------------ Environment --------------------------
static
{
RobotContext.useTorch(1, 250, 250, 100);
RobotContext.useShadow(50, 150, 450, 200);
RobotContext.useShadow(100, 300, 350, 450);
}
}
|
Execute the program locally using WebStart.
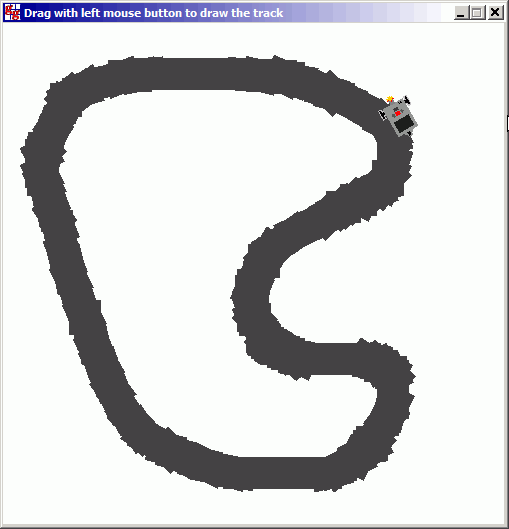
The underlying GameGrid may be used to draw the background interactively by using the left mouse button. Now some more advanced features of the JGameGrid framework enter the scene like a GGMouseListener, but still all initializing code is packed into _init() that may deleted or commented out for the real robot. During setting up the track, the application thread is halted by calling Monitor.putSleep() and resumed by Monitor.wakeUp() when the mouse button is released.
import ch.aplu.robotsim.*;
import ch.aplu.jgamegrid.*;
import java.awt.Color;
import ch.aplu.util.Monitor;
public class SimEx9
{
private static int xOld, yOld;
public SimEx9()
{
LegoRobot robot = new LegoRobot();
Gear gear = new Gear();
LightSensor ls = new LightSensor(SensorPort.S3);
robot.addPart(gear);
robot.addPart(ls);
Monitor.putSleep(); // Wait until track is drawn
while (true)
{
if (ls.getValue() > 800) // Bright
gear.leftArc(0.1);
else
gear.rightArc(0.1);
}
}
private static void _init(final GameGrid gg)
{
gg.setTitle("Drag with left mouse button to draw the track");
gg.addMouseListener(
new GGMouseListener()
{
public boolean mouseEvent(GGMouse mouse)
{
Location loc =
gg.toLocationInGrid(mouse.getX(), mouse.getY());
switch (mouse.getEvent())
{
case GGMouse.lPress:
xOld = loc.x;
yOld = loc.y;
break;
case GGMouse.lDrag:
gg.getBg().drawLine(xOld, yOld, loc.x, loc.y);
xOld = loc.x;
yOld = loc.y;
break;
case GGMouse.lRelease:
Monitor.wakeUp(); // Start simulation
break;
}
return true;
}
}, GGMouse.lPress | GGMouse.lDrag | GGMouse.lRelease);
gg.getBg().setPaintColor(Color.darkGray);
gg.getBg().setLineWidth(32);
}
public static void main(String[] args)
{
new SimEx9();
}
}
|
Execute the program locally using WebStart.
RobotSim also simulates the sound sensor by using the standard computer's audio input line. Modern notebooks have an integrated microphone, but when the simulation is run on a desktop computer, an external microphone is necessary, Keep in mind that the audio options (device, level) have to be properly set. In the following example, the NXT waits until a sound is emitted (whistle, clap), then it moves forward. If it hits the wall, it returns. At the next sound event, the NXT stops.
import ch.aplu.robotsim.*;
public class SimEx11 implements SoundListener, TouchListener
{
private Gear gear = new Gear();
public SimEx11()
{
LegoRobot robot = new LegoRobot();
SoundSensor ss = new SoundSensor(SensorPort.S1);
TouchSensor ts = new TouchSensor(SensorPort.S3);
robot.addPart(gear);
robot.addPart(ss);
robot.addPart(ts);
ss.addSoundListener(this, 50);
ts.addTouchListener(this);
}
public void loud(SensorPort port, int level)
{
if (gear.isMoving())
gear.stop();
else
gear.forward();
}
public void quiet(SensorPort port, int level)
{
}
public void pressed(SensorPort port)
{
gear.backward();
}
public void released(SensorPort port)
{
}
public static void main(String[] args)
{
new SimEx11();
}
// ------------------ Environment --------------------------
static
{
RobotContext.useObstacle("sprites/bar0.gif", 250, 50);
}
}
|

Execute the program locally using WebStart.
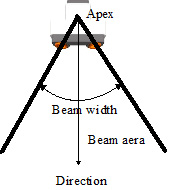
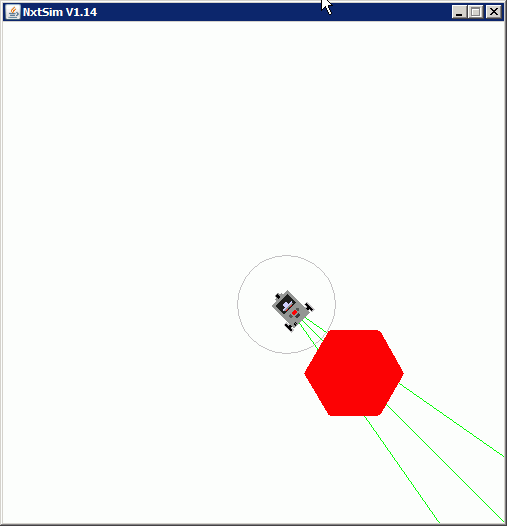
We simulate the ultrasonic sensor for distance measurements in two dimensions. We assume that the sensor determines the distance to the nearest reflecting target within a two dimensional cone (beam area) with its apex at the sensor location, the axis direction perpendicular to the sensor face and a fixed opening angle (beam width, aperture).
| |
|
|
| |
Ultrasonic beam definition |
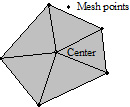
Target |
Targets are polygons that are detected by using a mesh of triangles drawn from an inner point (center). The Target class is derived from the Actor class and displays an attributed sprite image, but this image is not used for the target detection. The implemented distance detection algorithm uses the mesh and returns the distance to the nearest mesh triangle within the beam area. The number of targets is not limited and the targets may be created or modified at runtime.
Normally a fixed target layout is defined using the RobotContext class. This makes the code for the robot movement almost identical to the code for the real robot, either in direct or autonomous mode. In the first example the robot searches a target by a radar like movement. When a target is found, the robot moves to the target and stops some distance away.
import ch.aplu.robotsim.*;
import java.awt.*;
public class SimEx16a
{
private LegoRobot robot;
private Gear gear;
private UltrasonicSensor us;
public SimEx16a()
{
robot = new TurtleRobot();
gear = new Gear();
robot.addPart(gear);
gear.setSpeed(10);
us = new UltrasonicSensor(SensorPort.S1);
robot.addPart(us);
us.setBeamAreaColor(Color.green); // May be commented out
us.setProximityCircleColor(Color.lightGray); // May be commented out
runRobotProgram();
}
private void runRobotProgram()
{
searchTarget();
while (true)
{
if (us.getDistance() < 50)
gear.stop();
}
}
private void searchTarget()
{
while (true)
{
gear.right(50);
int distance = us.getDistance();
if (distance != -1)
{
gear.right(1500);
gear.forward();
return;
}
}
}
public static void main(String[] args)
{
new SimEx16a();
}
// ------------------ Environment --------------------------
static
{
Point[] mesh =
{
new Point(50, 0), new Point(25, 42), new Point(-25, 42),
new Point(-50, 0), new Point(-25, -42), new Point(25, -42)
};
RobotContext.useTarget("sprites/target_red.gif", mesh, 350, 350);
}
}
|
Execute the program locally using WebStart.
Targets may by created and removed at runtime. The environment section may contain code in a static _init() method that is automatically invoked before the application code runs. In the next example we register a mouse listener to remove an existing target and create a new one at the mouse press location. We also add a TouchListener to detect when the target object is hit. The robot then performs a pirouette, just for fun or to make the real object to fall over.
import ch.aplu.robotsim.*;
import java.awt.*;
import ch.aplu.jgamegrid.*;
public class SimEx16
{
private static LegoRobot robot; // Static, because used in _init()
private Gear gear;
private UltrasonicSensor us;
private TouchSensor ts;
public SimEx16()
{
robot = new TurtleRobot();
gear = new Gear();
robot.addPart(gear);
gear.setSpeed(10);
us = new UltrasonicSensor(SensorPort.S1);
robot.addPart(us);
us.setBeamAreaColor(Color.green); // May be commented out
us.setProximityCircleColor(Color.lightGray); // May be commented out
ts = new TouchSensor(SensorPort.S3);
robot.addPart(ts);
runRobotProgram();
}
private void runRobotProgram()
{
while (true)
{
if (ts.isPressed())
{
gear.setSpeed(70);
gear.right(3000);
gear.stop();
return;
}
int distance = us.getDistance();
if (distance == -1)
searchTarget();
}
}
private void searchTarget()
{
while (true)
{
gear.right(50);
int distance = us.getDistance();
if (distance != -1)
{
gear.right(1500);
gear.forward();
return;
}
}
}
public static void main(String[] args)
{
new SimEx16();
}
// ------------------ Environment --------------------------
private static void _init(final GameGrid gg)
{
gg.setTitle("Click to place target");
Point[] mesh =
{
new Point(50, 0), new Point(25, 42), new Point(-25, 42),
new Point(-50, 0), new Point(-25, -42), new Point(25, -42)
};
final Target target = new Target("sprites/target_red.gif", mesh);
final Obstacle obstacle = new Obstacle("sprites/target_red.gif");
gg.addMouseListener(
new GGMouseListener()
{
public boolean mouseEvent(GGMouse mouse)
{
Location loc =
gg.toLocationInGrid(mouse.getX(), mouse.getY());
robot.addTarget(target, loc.x, loc.y);
robot.addObstacle(obstacle, loc.x, loc.y);
return true;
}
}, GGMouse.lPress);
}
}
|
Execute the program locally using WebStart.
| |
 LinkUp
 TCPCom
 Simulations