|
Easy Programming With No Frustration
Aims
In early days of personal computers, small microcontroller based computing units like Comodore, Apple 2 and IBM PC provided action, fun and an informative learning platform for a whole generation of young computer enthusiast. This fruitful time got lost with the growing complexity of modern computers, operating systems and programming languages. But in the last couples of years, small systems like the Arduino and Raspberry Pi gained popularity and coding became almost a popular art. It is a duty of all educators to prevent these people to reinvent the wheel and let them fall into the same programming pitfalls as decades before. It is our aim and mission to provide extremely user-friendly programming environments and libraries to make programming easy and avoid frustrations.
The BBC micro:bit is a simple, but motivating computing board with a general purpose hardward interface that provides digital input/ouput, PWM, sound and analog input. Moreover an acceleration sensor detects movements of the board such as tilting and shaking. A dot matrix led array displays simple images, letters and numbers. Short texts are displayed by slowly scrolling each letter. Fortunately the MicroPython group has ported an importan subset of the Python programming language to micro systems, so Python runs smoothly on the micro:bit also due to the addition of some simple classes to handle the hardware.
The standard development environment for Python programs is mu-editor, a "micro" editor for MicroPython and the BBC micro:bit (see here). It has many interesting features, but lacks of a run time terminal (REPL) to display syntax errors and print() output. Programming errors are frequent, even for professional programmers, so the handling of errors is essential for any programming environment. With mu-editor it is hard to decipher the scrolling error messges on the dot matrix display.
The MicroBit Manager (MBM)
To overcome the lack of runtime information with mu-editor the MicroBit Manager (MBM) can be used for remote program development with various well-known program editors/ IDEs. After editing the source, by one click it is downloaded and a terminal window (REPL) opens where the program execution is supervised with keyboard interaction. Syntax errors and print() output are shown like in a local Python IDE. By pressing Ctrl+C the program is halted and the Python prompt is presented. Here the user can enter commands and execute them with the MicroPython interpreter. As option, the MBM can flash micro:bit's firmware from an internal firmware image that is slightly modified from the original to suppress the long lasting writing out of error messages on the dot display, thus greatly accelerating the development cycle. Moreover after flashing, the python module mbutils.py is copied to the micro:bit's file system, to provide some practical additional functions, especially for controlling the micro:bit buggy (by Kitronik).
During the program development, the micro:bit board is connected to the development system via the USB interface. (Use a standard USB data cable, not a power-only cable.) It then appears as a extra external USB device with its own drive letter (Windows) or as an extra drive name (Mac, Linux). When the terminal window is open and for up- and downloading files other than the firmware, the micro:bit is addressed as a serial device (via USB), thus uses a ComPort (Windows) or a serial device name (Mac, LInux). For Windows versions earlier than 10, an mbed driver must be installed, which can be downloaded from here. No additional driver is required for Windows 10 and Mac/Linux.
The MicroBit Manager is integrated into TigerJython (download from here) and does not need any additional installations. To be used standalone or with other IDEs, it can be downloaded from here as a Java application (including source). All its functions are selected via command-line parameters, which are listed when calling MBM without parameters (java -jar MBM.jar)
TigerJython IDE for Remote Development
To enable the MBM in TigerJython, choose Preferences | Library | Chose robot and select micro:bit.
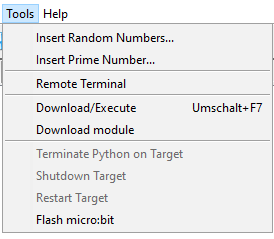
An additional black-bordered button appears in the taskbar and the options Remote Terminal, Download/Execute, Download module, Flash micro:bit are enabled in the Tools menu.
A click of the taskbar button corresponds to choosing the Download/Execute menu option.
The source is written in the editor window of TigerJython and then stored on the development system like other Python programs. But since the program is not executed on the development system, but on the micro:bit, instead of pressing the green run-button the black-bordered download/execute-button is clicked (or Tool option Download/Execute selected). The code is then checked for syntax errors with TigerJython's special Python parser and user friendly error messages are displayed in the editor window near the position where they are detected. If the program passes the parsing process, an extra terminal window (REPL) is obened, in which the communication process with the micro:bit is traced. This comprises the following steps:
- stopping a running program
- source downloading to the target file system as main.py (overwriting an existing file)
- executing Ctrl+D to perform a soft boot that starts main.py
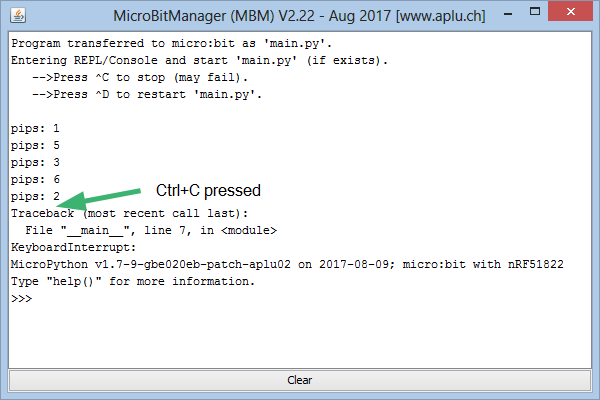
Any print() output and all error messages are displayed in the terminal window and by typing Ctrl+C the program can be halted. After a program stops, Python's interpreter prompt >>> is displayed and commands can be entered. A simple Ctrl+D performs a soft boot and restarts the program. There is no need to close the terminal window: when a new version is downloaded from the development system, the window closes automatically and a new window is opened.
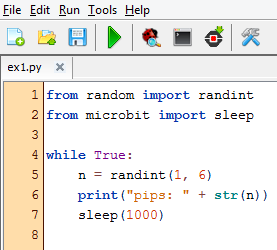 TigerJython Editor Source TigerJython Editor Source |
|
 |
|
|
|
Execution in Terminal Window |
Because a running program is stopped automatically, it is allowed to write non-terminating programs or endless loops, as it is common for microcontroller programs written in C or assembler. However, these loops should not overload the processor, because otherwise the program interruption may fail (insert at least a 1 ms sleep in tight loops).
To support structured programming, Python modules can be copied to the target system using the option Download module. As usual they are integrated with an import statement. Unfortunately to the size of programs and modules cannot exceed more than a few kBytes due to the lack of memory space.
After a program has been downloaded (and renamed automatically to main.py), the USB connection to the development system can be unplugged. Each time the USB port of the micro:bit is powered with 5V by a USB charger or USB power bank, the main.py is immediately started.
If main.py hangs or the micro:bit becomes unreachable because of a faulty software manipulation, a new system can be installed from scratch by flashing the firmware. Because all program modules are lost, they must be restored from the development system.
The Python interpreter MicroPython is not a full implementation of Python 3.x, but most language features are available. The special hardware of the micro:bit is accessed by importing the module microbit: import microbit or from microbit import * (see the doc here).
Geany IDE for Remote Development
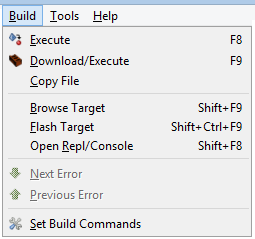
Geany is a flexible program editor that is widely user-configurable. The MicroBit Manager tool (MBM) integrates smoothly into the Geany Build Commands. Geany scripts are automatically downloaded and executed to the micro:bit in a one click action. The output to stdout and stderr (Python print commands and error messages) are captured and shown in a separate console-like terminal window (REPL). In our opinion, this combination of Geany and MBM provides a very convenient way to work with the micro:bit (if you do not want to use TigerJython). Just hit F9 (or press Build icon) and the current content of the editor is saved locally and transferred to the micro:bit. Any other running program is then halted and the new script executed by the MicroPython interpreter, reporting any error or output messages back to the development system. Below you see how the Build menu is populated:
 |
|
| Download/Execute |
Stops any running program, downloads the current script and rename it to main.py. Perform a soft reboot that starts main.py |
| Copy File |
Downloads the script without changing its name |
| Browse Target |
Shows the files in the target file system |
| Flash Target |
Install micro:bit firmware from an image included in MBM |
| Open Repl/Console |
Opens a terminal window that allows interactive keyboard commands |
|
Installation:
-
First download and install Python2.7 and Geany on your computer. (Consult the Geany homepage for more information. A nice tutorial can be found here.)
-
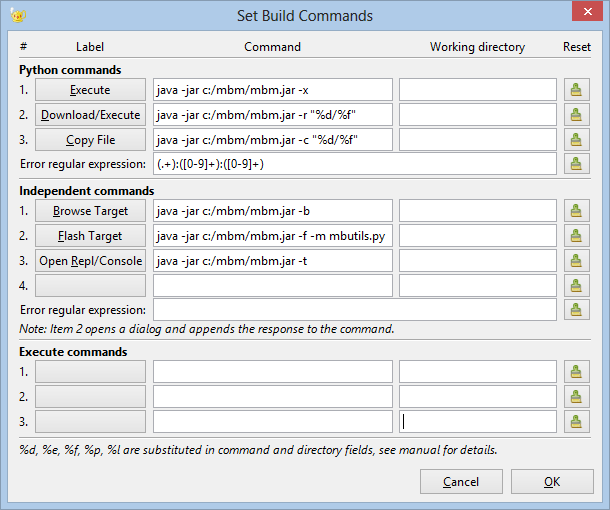
Download MicroBitManager.jar from here and copy it in any directory (in the following example under Windows in c:\mbm). Open Geany's Build | Set Build Commands and enter the command options link shown below (use copy&paste to simplify the editing). The shortcut (underlined character) is selected be prefixing the letter with _).
Using the MBM API:
As an additional feature, operations of the MBM can also be executed by a Python program running in TigerJython. After import mbm the following functions are available:
Module Import: from mbm import *
| Function |
Action |
| showFiles() |
browses the file system of the micro:bit and displays all file names
|
| openTerminal() |
opens a terminal window (REPL) and connects to the micro: bit |
| extract(filename) |
copies the file filename from the micro:bit to the directory, where the TigerJython program is located
|
| enableDataCapture(enable) |
turns on/off capturing of text lines in the terminal window (REPL). Data is buffered in a list and retrieved with getDataLines() |
| getDataLines() |
returns the the content of the data buffer (list of string elements) and empties it. Returns an empty list, if the buffer contains no data |
| copy(filename) |
copies the file filename from the development system to the micro:bit. The filename remains the same, but the directory path is truncated |
| run(filename) |
opens a terminal window (REPL) and copies the file filename from the development system to the micro:bit. Renames it to main.py and runs the program. A given directory path is truncated
|
| runMain() |
opens a terminal window (REPL) and runs main.py (if available) |
| flash() |
copies a firmware image and the module mbutils.py from the distribution to the micro:bit.
|
| flash(filename) |
copies the specified firmware image (hex file) and the mbutills module from the distribution to the micro:bit |
In a typical example, the micro:bit acts as data logger and data is collected in a local data file. When finished, the file is transferred to TigerJython by calling extract(filename) where it is further processed. To collect data in real-time, Bluetooth may be used to transfer data from the data-collecting micro:bit to another micro:bit attached to a computer that uses enableDataCapture() and getDataLines() to retrieve and process the data immediately (see examples in the following chapters).
MBM command line options
Command
(short) |
Command
(long) |
Argument
|
Action |
| -c |
--copy |
source path |
Download file (keep name) |
| -d |
--debug |
- |
Debug mode: Verbose debug messages to stdio |
| -e |
--extract |
file name |
Extract file from target |
| -f |
--flash |
- |
Flash firmware. (All files are erased) |
| -h |
--help |
- |
Show help message |
| -m |
--module |
Path to module file. |
If file is not found,
extracted from JAR file |
| -o |
--options |
Options setting
{key1=value1;key2=value2;...}
where keys are:
console.xpos,console.ypos (-1: screen center)
console.width,console.height, console.fontsize |
Select Options
e.g. -o {console.ypos=400;console.fontsize=14} |
| -p |
--port |
Serial port (COM port) |
If omitted, COM port search
performed |
| -t |
--terminal |
- |
Open terminal/console (REPL) |
| -v |
--volume |
Volume name |
If omitted, volume name search
performed |
| -w |
--firmware |
Path to firmware hex file |
If omitted, hex in JAR
file assumed |
| -x |
--execute |
- |
Open terminal/console (REPL) and execute main.py |
Appendix: micro:bit Technical Documentation
-
Size: approx. 5cm x 4cm
-
Weight: 8g
-
Main microprocessor: 32-bit ARM® Cortex™ M0 CPU, nRF51822 from Nordic Semiconductor
-
A 5x5 LED matrix with 25 red LEDs to light up. Each LED is individually programmable and can display animated patterns, scrolling text and alphanumeric characters
-
Two programmable buttons. The micro:bit can detect either of its two buttons being pressed and unpressed, and can be programmed to act on that or send the information to another device. Use them as a games controller, or control music on a smartphone.
-
On-board motion detector or 3-AXIS digital accelerometer that can detect movement and tell other devices you’re on the go. It measures on 3 axes, X, Y, Z, and sends back the data in milli-gs. The micro:bit can react to this data and tell other devices it is moving. The device will also detect a small number of standard actions, eg shake, tilt and freefall. Turn the micro:bit into a spirit level. Use it for motion-activated games. Have your micro:bit light up when something is moved.
-
A built-in compass, 3D magnetometer to sense which direction you’re facing and your movement in degrees. This data can be used by the micro:bit in a program or be sent to another device. The magnetometer could also detect the presence of certain metals and magnets.
-
Bluetooth® Smart Technology (previously called Bluetooth Low Energy) to wirelessly communicate with other Bluetooth Smart devices and exchange data and commands. Connect the micro:bit to other micro:bits, devices, phones, tablets, cameras and everyday objects all around. Play games, share creations or join forces to create multi-micro:bit masterpieces. Take a selfie. Pause a DVD or control your playlist.
-
Five Ring Input and Output (I/O) including power (PWR) and ground (GRD). PWR, GRD, I/O x 3. Each I/O ring is programmable to be either analogue or digital. The rings are suitable for crocodile clips or 4mm banana plugs, meaning an external sensor can be connected to measure things like temperature, moisture, proximity to other devices. The micro:bit reads values from the sensor and acts on them or sends them to another device. The micro:bit can also send control commands to the rings – these could be used to control things like a motor or robot. The PWR and GRD rings supply 3 volts and could be used to power a separate device.
-
Edge Connector: 20 pins, 1.27mm pitch and extend 7.62mm from board edge suitable for standard connectors. This allows the micro:bit to be connected to another device, eg Arduino, Galileo, Kano and Raspberry Pi through a standard connector.
-
Micro-USB contoller: This is controlled by a separate processor and presents the micro:bit to a computer as a memory stick. This means the program can be dragged onto the micro:bit in the same way a file is dragged onto a memory stick.
- System LED x 1 (yellow)
-
System push button switch x 1
LEDs 9 x 3
The LED matrix is physically layed out as a 5x5, but it is implemented in hardware as a scanned matrix of 9x3 (i.e. 9 colums by 3 rows). Row 2 Col 8, and Row 2 Col 9 are not used.
The LED matrix is driven via a high-speed multiplex generated by application processor software. This software also uses the LED Row and Col pins to implement the light sensing feature. Some of the Columns appear on the edge connector, so if you want to use extra GPIO pins, you have to disable the display in software.
Interface Processor
The Interface sheet shows the KL26 processor, which is an ARM processor that implements the USB protocol for the USB connector. This provides a method for loading code onto the application processor, using a drag and drop interface.
The USB protocol handler on this processor implements a Mass Storage Class device in order to offer the drag and drop code load interface. It also provides a Connected Device Class that allows a serial port interface to be used across the USB.
The interface processor also contains an on-board regulator that steps down the USB voltage to 3.3V suitable for powering the rest of the micro:bit, and you can draw 120mA from this processor regulator. A TVS device is fitted to suppress ESD spikes and out of range voltages that could be present on the USB connector.
This processor does not have any connection to the GPIO pins on the micro:bit.
Sensors
There are two sensor IC’s on the micro:bit, an accelerometer and a magnetometer. The accelerometer measures acceleration in 3 axies, and the magnetometer can be used as a compass, as well as a magnetic field detector.
Both devices are connected to the application processor I2C bus, and this bus is also connected to two pins on the edge connector. I2C pullup resistors are pre-fitted on the board.
The magnetometer can generate one processor interrupt for the application processor, and the accelerometer can generate two different processor interrupts for the application processor.
Note, the physical orientation of these two IC’s is important for binary compat with the driver code in the application processor, which assumes a particular physical orientation in it’s calculations.
Power Supply
Power to the micro:bit can be provided by 3 sources: The USB, the battery connector, and the 3V pad on the edge connector.
For USB powering, the KL26 interface processor has an on-board regulator that brings the external USB voltage into the correct range for the micro:bit board.
A low-Vf diode (in this case about 0.23V max) is used to switch between sources. The diode prevents back-powering of any source from any other source.
Care should be taken if powering the micro:bit from the 3V pad on the edge connector, as the trace from that pad is connected directly to the IC’s on the board. Please check the datasheets for the appropriate IC’s for their maximum tolerable voltages.
Application Processor
The main application processor nRF51822 runs both the runtime code and user code, as a single binary image.
Code is loaded into this processor via the interface processor.
Communications via USB serial is done via the interface processor.
All GPIO pins on the edge connector are serviced by this application processor.
All bluetooth features are provided by a SoftDevice stack loaded into this processor.
Edge Connector
The edge connector is the main interface to external components attached to the micro:bit.
This interface has a range of digital, analog, touch, pwm, and serial communications interfaces.
10Mohm weak pull-up resistors are fitted on P0 P1 and P2 for use in touch sensing mode, where they provide a weak pull-up to the supply providing a default high input and the user touching the GND pad pulls the pin down towards 0V, providing a low input. When in non touch modes, these pads have stronger internal pull-downs enabled in the software, so that the default input state when not connected is ‘low’.
Guard pins are provided both sides of the 3V and GND pads, so that shorting by crocodile clips does not degrade the features of the device by causing spurious inputs.
Both the front and the back of each of the 5 round ring pads are electrically connected.
A number of pins have alternate assigned functions for use by the micro:bit, many of these can be disabled in software to gain more general purpose IO pins.
nRF51822 Microcontroller from NORDIC Semiconductor, Product Specification
Download
|
 LinkUp
 TCPCom
 Simulations