The source code of all examples can be downloaded from a link in the right side bar.
More examples will be subject to my whim.
Example 1: Sensor data logger
Aim:
Use the micro:bit to make x-axis acceleration measurements every 50 ms for a duration of 10 s and store the data in a file in the local file system. Write a program in TigerJython to retrieve the data file and display the measurements in a acceleration versus time diagram.
# DataLogger.pyfrommicrobitimport*
display.show('D')
t =0
T =5
dt =50# mswithopen('data.log', 'w') as f:
while t <=10:
v = accelerometer.get_x()
data =str(t) +':'+str(v) +'\n'
f.write(data)
t += (dt /1000)
sleep(dt)
display.show(Image.NO)
Program running on micro:bit
# ViewData.pyfromgpanelimport*frommbmimport*
makeGPanel(-1, 11, -1200, 1200)
drawGrid(0, 10, -1000, 1000, 'darkgray')
title('Extracting data...')
extract('data.log')
title('Acceleration versus Time')
withopen('data.log') as f:
data = f.read()
lines = data.split('\n')
i =0for line in lines:
z = line.split(':')
if z == ['']:
break
t =float(z[0])
v =float(z[1])
if i ==0:
pos(t, v)
else:
draw(t, v)
i +=1
Program running in TigerJython
Remarks:
It is recommended to use '\n' (line feed) as line separator in micro:bit's log file. Time and measurement pairs are separated by a colon. Since data is transferred via a serial communication, extract() takes some time. The file is copied into the directory where DataLogger.py resides (file name unchanged).
Since executing the code in the while loop takes some time to run, the sampling period is not exactly 50 ms.
Typical trace:
Example 2: Distance measurement using a infrared detector
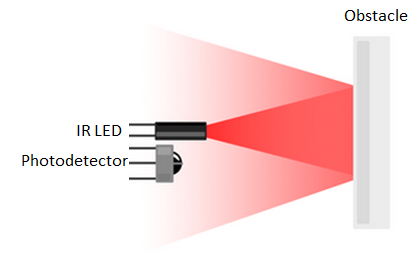
Infrared sensors are also used for light barriers, where a infrared source emits light not visible to the human eye. This may present some advantages over devices where the light beam is visible. Because many materials reflects infrared waves, a reflective light barrier are widely use in all kind of distance detectors. For short distances (1 - 100 cm) the light source is a photodiode (IR LED) that emits IR light around 1000 nm and a photodiode or phototransistor captures the reflection and translates the light intensity to a voltage
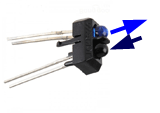
Both components can be mounted in the same housing. In hobby robotics the reflective optical sensor with transistor output TCRT5000 from VISHAY is widely used. (It can be purchased from many sources, e.g. 4tronix (http.//4tronix.co.uk) or by an Ebay search. For detailed information, consult the data sheet and the application examples.
The distance-to-voltage relationship is completely non-linear (small distances produce a high light level and the resistance of the phototransistor becomes smaller, so the output voltage goes up). But In many proximity sensor applications, the absolute value of the distance is not of importance because the sensor is used to trigger an action, when the distance cross a certain level (from far to near or vice versa).
Aim:
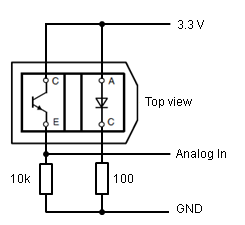
Use the TCRT5000 to measure the distance in range 2 cm ...10 cm. You need a 100 Ohm and a 10 kOhm resistor in the following circuitry. The output voltage is measured with P1 (not P0) configured in Analog In mode. You can solder the components directly on the motor driver board of a Kitronik buggy or insert them in a female header solder in the spare pins of the driver board.
You can solder the components directly on the motor driver board of a Kitronik buggy or insert them in a female header solder in the spare pins of the driver board. Do not forget to remove the corresponding cable going to P1 from the line follower board.
Display raw data
Display transformed data
# DistanceRaw.pyfrommicrobitimport*whileTrue:
v = pin1.read_analog()
print(v)
sleep(500)
# DistanceIR.py# Fit to y = a / (b * x + c)# Parameters from NonLinFit.pyfrommicrobitimport*
a =329
b =0.22
c =0.11defconvert(x):
return a / (b * x + c)
whileTrue:
v = pin0.read_analog()
d = convert(v)
print(d)
display.show(str(int(d)))
sleep(500)
Remarks:
The parameters of the fit hyperbolic fit function are determined from a measurement of distance to voltage pairs every cm in the range 1...10 cm. The non-linear fit is performed with TigerJython's fitting and graphics modules.
# NonLinFit.pyfromgpanelimport*fromfitterimport*
makeGPanel(-1, 11, -100, 1100)
drawGrid(0, 10, 0, 1000)
lineWidth(2)
xdata = [1, 2, 3, 4, 5, 6, 7, 8, 9, 10]
ydata = [970, 697, 424, 293, 232, 201, 178, 166, 158, 152]
deffunc(x, params):
# y = a / (b * x + c)
a = params[0]
b = params[1]
c = params[2]
return a / (b * x + c)
defderivatives(x, params):
a = params[0]
b = params[1]
c = params[2]
return [1/ (b * x + c), - a * x / (b * x + c)**2, - a / (b * x + c)**2]
for i inrange(len(xdata)):
if i ==0:
pos(xdata[i], ydata[i])
else:
draw(xdata[i], ydata[i])
initialGuess = [1, 1, 1]
coeffs = functionfit(func, derivatives, initialGuess, xdata, ydata)
print coeffs
setColor("red")
for i inrange(len(xdata)):
x = xdata[i]
if i ==0:
pos(x, func(x, coeffs))
else:
draw(x, func(x, coeffs))
Example 3: Hand Follower: A funny application for the Kitronik buggy
Aim:
Mount a TCRT5000 infrared distance sensor on the motor driver board at the rear of the buggy. The vehicle must keep a certain distance to a hand (or another IR reflecting object) by moving backward and forward.
Program:
# HandFollower.pyfrommicrobitimport*frommbutilsimport*
display.show(">")
whilenot button_a.was_pressed():
sleep(100)
whilenot button_b.was_pressed():
v = pin1.read_analog()
print(v)
if v >300:
buggy_forward()
display.show("F")
elif v <180:
buggy_backward()
display.show("B")
else:
buggy_stop()
display.show("S")
sleep(100)
buggy_stop()
display.show("H")
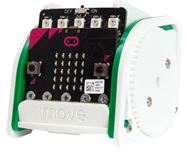
Example 4: Playing with the Kitronik :MOVE mini buggy
The a :MOVE is a 2 wheeled robot using continuously running stepping motors. It is suitable for simple demonstrations of autonomous robots or remote control. It is also equipped with an array of 5 neopixels compatible with MicroPython's NeoPixel class.
Aim:
Move forward than left in an endless loop until the A button is pressed. Then stop until the button is pressed again.
Program:
# MoveMini.pyfrom microbit import *
from neopixel import *
def forward():
pin1.write_analog(75 - speed)
pin2.write_analog(75 + speed)
def left():
pin1.write_analog(75 - speed)
pin2.write_analog(0)
def stop():
pin1.write_analog(0)
pin2.write_analog(0)
def lightLeft():
for i in range(3):
np[i] = (0, 0, 0)
np[3] = (0, 10, 0)
np[4] = (0, 10, 0)
np.show()
def lightStop():
for i in range(5):
np[i] = (10, 0, 0)
np.show()
def lightOn():
for i in range(5):
np[i] = (10, 10, 10)
np.show()
np = NeoPixel(pin0, 5)
speed = 10
while True:
whilenot button_a.was_pressed():
display.show("F")
lightOn()
forward()
sleep(3000)
display.show("L")
lightLeft()
left()
sleep(700)
stop()
display.show("S")
lightStop()
whilenot button_a.was_pressed():
sleep(10)
Example 5: The micro:bit as sensor front-end to a Raspberry Pi
Aim:
Use the micro:bit to make x-axis acceleration measurements every 100 ms and transfer data to a Raspberry Pi, where they can be processed in any way (or just written to the console or shown on a attached numeric display).
Program:
from microbit import *
display.show("D")
dt = 500 # ms# signal host that transmission starts:print("starting")
whilenot button_b.was_pressed():
v = accelerometer.get_x()
print(v)
sleep(dt)
display.show(Image.NO)
Program running on micro:bit
import serial
port = "/dev/ttyACM0"# micro:bitdef readLine(port):
s = ""while True:
ch = port.read()
if ch == "":
return None # timeout
s += ch
if ch == '\n':
return s[:-2] # remove cr/lf
ser = serial.Serial(port, baudrate = 115200,
timeout = 3)
while True:
rcv = readLine(ser)
if rcv == None: # timeoutbreakprint rcv
print"Stop"
Program running on Raspberry Pi
Remarks:
As you see in the program running on the Raspberry Pi, the micro:bit attached to the USB port is detected as serial device with the port name /dev/ttyACM0 without the need of any addional drivers or special Linux setups.
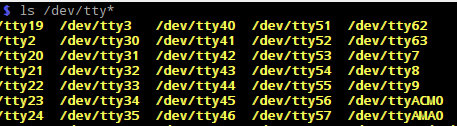
You may check the presence of this additional serial device by calling ls /dev/tty* in a Linux terminal:
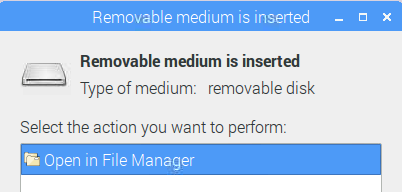
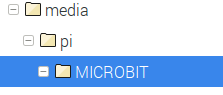
At the time you insert the USB cable to the Raspberry Pi, the micro:bit is seen as a new removable device and a window opens. If you answer "YES", the device is shown in the File explorer as /media/pi/MICROBIT.
 LinkUp
 TCPCom
 Simulations