The source code of all examples can be downloaded from a link in the right side bar.
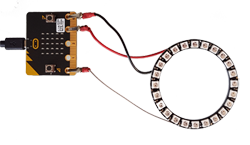
NeoPixels are RGB color LEDs with a build-in controller. Normally they are WS2812B devices (datasheet) from Worldsemi. Each device has 4 pins: GND, VCC, DIN, DOUT. Supply voltage is specified from 3.5V to 5.5V, but they also work perfectly with 3.3V from a micro:bit.
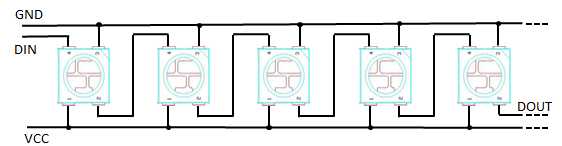
NeoPixels can be daisy chained, so many LEDs may be lined-up as follows:
The color of each LED is determined by three bytes (g, r, b) in the order green/red/blue. The data stream at DIN is a byte sequence g, r, b for each LED: g1, r1, b1, g2, r2, b2, g3, r3, b3, ... where 1 is for the first LED (most left), 2 for the second, 3 for the third, etc. Every device picks out the first three bytes from the data stream coming from its input pin and uses them to turn on its green/red/blue diodes. The rest of the data stream is simply passed to the output pin and serves as input to the next device. In other words, the devices implements a recursive algorithm: From the byte stream at DIN take first 3 bytes and output the rest at DOUT.
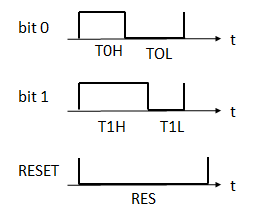
The bits are coded as duration of low and of high levels as follows:
T0H = 0.4 μs TOL = 0.85 μs
T1H = 0.8 μs T1L = 0.45 μs
RES > 50 μs
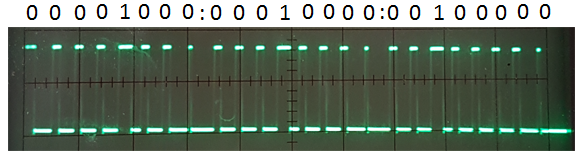
The reset pulse (idle time) is required after the transmission of the whole data stream. Timings have to be accurate to ±0.15 μs. The following CRO image shows the pulse sequence for 1 LED with grb = (8, 16, 32) created by the program:
NeoPixels may be arranged in different geometries: in a line (LED strip, stripe, normally a flexible band), in a circle or as rectangular matrix. But any other arrangement is also possible, even in a 3-dimensional construction. The length of a strip can be modified any time be adding more LEDs or cutting the end. To drive many LEDs at high luminosity an external power supply (3.5 to 5 V) must be used, but for as many as 150 - 200 LEDs driven with low luminosity (r,g,b < 30) the micro:bit delivers enough current at its 3.3V pin.
All examples below uses either a LED strip of up to 144 LEDs or a circle with up to 24 LEDs. They are available from many distributors (among them Adafruit, Seed, and from China). The price and delivery time may vary considerably. (Be sure to get WS2812B type LEDs, there are other LED strips using the APA 102 chip that works quite differently using a data and clock line. These chips have 6 pins instead of 4 for the WS2812B.)
Example 1: One pixel movement forth and back
Aim:
The green pixel moves along the strip back and forth.
frommicrobitimport*fromneopixelimport*
nbLeds =24
np = NeoPixel(pin0, nbLeds)
i =0
di =1# forward
dt =50# mswhileTrue:
np[i] = (0, 10, 0)
np.show()
sleep(dt)
np.clear()
i += di
if i == nbLeds -1or i ==0:
di =-di
Remarks:
The NeoPixel class works as follows: The constructor takes the pin number of the data line and the total number of pixels and returns an instance here called np. The color of each pixel can be set by assigning a tuple of three color values (r, b, g) in range 0..255 (for (0, 0, 0) the LED is turned off). The assignment only affects the internal data structure. To send the data to the LEDs, np.show() must be called.
Use meaningful named constants to setup your system.
Example 2: Growing worm in different colors
Aim:
One pixel after the other is lit until all LEDs are turned on. The color of the worm varies.
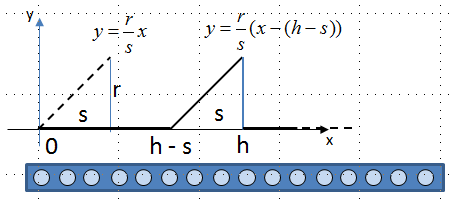
Aim:
A snake is a sequence of LEDs where the luminosity is zero for x < h - s, then increases linearly to the head h and drops to zero for x > h (s: spread).
frommicrobitimport*fromneopixelimport*deff(x, h):
if x < h - s or x > h:
y =0else:
y = (r / s) * (x - (h - s))
return y
defsnake(h, color):
for i inrange(nbLeds):
y = f(i, h)
np[i] = (int(color[0] * y), int(color[1] * y), int(color[2] * y))
np.show()
defsnakeMove(color):
for h inrange(0, nbLeds + s):
snake(h, color)
sleep(50)
nbLeds =24
r =40
s =5
np = NeoPixel(pin0, nbLeds)
whileTrue:
snakeMove((1, 0, 0))
snakeMove((0, 1, 0))
snakeMove((0, 0, 1))
snakeMove((1, 0, 1))
Remarks:
The solution is well-structured: First we define the function f(x, h) as shown in the function plot above. Then we construct a snake with head at fixed h and given color (r, g, b in range 0...1). Then we define the snake movement, where the head goes from 0 until the tail is out of view (head at nbLeds + s). Finally we call the snake movement with different colors in the main program.
Example 4: Flickering colors
(Inspired by programs called "fire" found on Internet.)
Aim:
Generate flickering random colors for a while and then smoothly changing colors (same on all LEDs).
frommicrobitimport*fromneopixelimport*fromrandomimport randint
nbLeds =24
np = NeoPixel(pin0, 24)
whileTrue:
for _ inrange(0, 100):
foridinrange(0, nbLeds):
red = randint(0, 50)
green = randint(0, 50)
blue = randint(0, 50)
np[id] = (red, green, blue)
np.show()
sleep(randint(10, 100))
for color inrange (0, 128):
foridinrange(0, nbLeds):
np[id] = (color, 0, 0)
np.show()
sleep(10)
for color inrange (0, 128):
foridinrange(0, nbLeds):
np[id] = (128- color, color, 0)
np.show()
sleep(10)
for color inrange (0, 128):
foridinrange(0, nbLeds):
np[id] = (0, 128- color, color)
np.show()
sleep(10)
Remarks:
Put the LEDs into a semi-transparent candle cup and enjoy the light show.
 LinkUp
 TCPCom
 Simulations