|
To access the Raspi Linux system, a screen, keyboard and mouse can be plugged directly into the Raspi ports. But it is more convenient to use a remote connection over TCP/IP, because it is possible to exchange data using the SFTP protocol or copy/paste to/from the local clipboard when using a terminal. Both systems, the Raspi and the PC must be connected through the same access point (hotspot). (In a later section you will learn how to access the Raspi over a wide-area Internet connection.)
You must prepare the RaspiBrick firmware on the SD-card to connect to your hotspot. To do so, insert the card into a card reader and a small FAT32 partition is shown. Start the RaspiBrickConfig.jar either by double-clicking it (or type java -jar RaspiBrickConfig.jar in a console). A dialog opens.
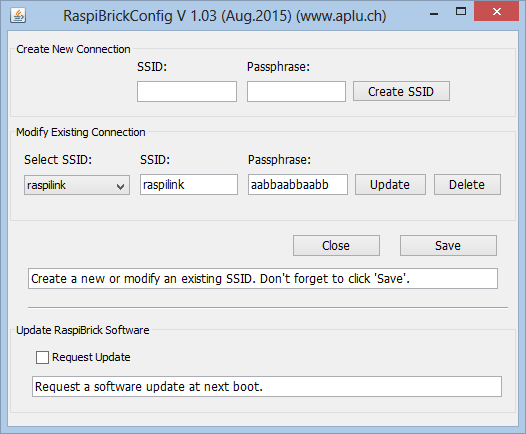
You enter the SSID/Passphrase of your hotspot (WPA Personal security is required) and save it (you may delete the existing SSID). Eject the SD-card from your PC, insert it in the Raspi and boot it. After a while, the Raspi fetches the hotspot info and reboots automatically. It connects then to the hotspot and displays the IP address received from the hotspot's DHCP server on the 7-segment display. (If supported by your WLAN-router, you may bind the WLAN MAC address to a fix IP address using the router config utility.)
When the Raspi is running and connected to the hotspot, you may find out the IP address, the WLAN stick MAC address and the hosts name by lauching an IP scanner utility (e.g. http://www.advanced-ip-scanner.com).
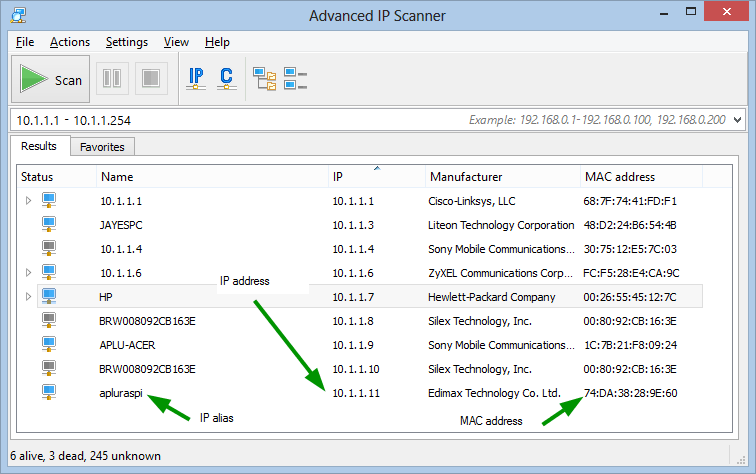
The IP alias is a name you may define in the PC system's hosts file (search in the OS file system for a file named hosts). The easiest way to check if the PC connects to the Raspi is to execute a ping request. Open a terminal (shell) and type ping <ipaddress>. You should get a reply like

To establish a terminal session, a SSH client must be used, e.g. the famous PuTTY (under Windows). A console window opens and you log-in with username pi and password raspberry.

You are now in the home directory of the user pi and you can perform Linux shell commands, e.g.
| ls |
list the files in the current directory |
| uname -a |
show the current Linux version |
| ps -e |
list all running processes |
| sudo halt |
shutdown processor |
| sudo shutdown -r now |
shutdown and reboot |
| nano <filename> |
simple text editor |
| cat <filename> |
show content of text file |
Consult a Linux manual (book or online) and try some other commands. The RaspiBrick installation provides some additional user defined commands that are listed below:
| rkill |
kill all Python processes (and the RaspiBrick firmware) |
| rmon |
(re)start the RaspiBrick firmware (monitor) |
| pyrun <prog.py> |
start a Python program with raspilib modules in Python path (as sudo) |
| jrun <prog.jar> <main-class> |
start Java program with RaspiLib.jar in Java classpath (as sudo) |
Be aware that the firmware is a Python program and must be terminated with rkill before a Python user script is started from the command line.
To explore the file system, it is convenient to use the GUI-based SFTP client. Under Windows WinSCP is recommended. (Under Linux give a try to Remmina). Select the SFTP protocol in the File protocol field. When you log-in the first time as user pi with password raspberry you end up in the /home/pi folder where you see some subfolder created by the RaspiBrick installation:
| install |
Files repository from the firmware installation |
| raspibrick |
Active firmware Python and shell scripts, Java and Python module library
|
| scripts |
Python user scripts |
| programs |
Java user programs |
| tigerjython |
TigerJython and examples (only used with Raspiberry LXDE desktop) |
To convince you that the Raspberry Pi is a full-fledged computer running Linux, write the "Hello Raspi" application either in Python or Java (or both) depending on your programming interests. Edit the program sources using the nano editor.
For Python, create helloraspi.py with the simple line
print "Hello Raspi!"
and execute it with python helloraspi.py.

For Java, create HelloRaspi.java with the following content:
public class HelloRaspi
{
public static void main(String[] args)
{
System.out.println("Hello Raspi!");
}
}
Compile the program with javac HelloRaspi.java. To execute it, type java HelloRaspi.

Congratulations! Your first programming experience with the Raspberry Pi is successfully finished.
Accessing the Raspberry Pi with Remote Desktop
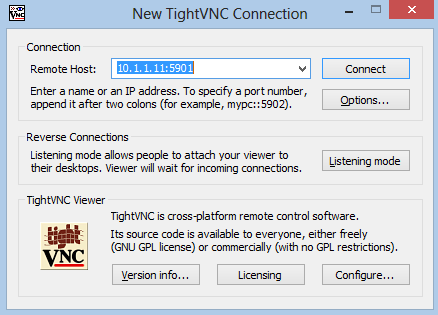
You do not need to connect a screen/keyboard/mouse directly to the Raspi to enjoy the Linux GUI desktop (LXDE). Since the RaspiBrick firmware starts a VNC (Virtual Network Computing) server automatically, the desktop may be accessed remotely by a VNC viewer (VNC client). Try it out by downloading TightVNC and install the viewer (not the server) on your PC. Again, all what you need to know is the IP address of the Raspi and the port 5901, where the VNC server is listening.
Remote desktop requires a password identification. The password is simply 123456.
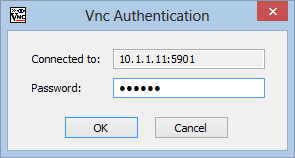
After clicking OK, the Raspi desktop appears miraculously.
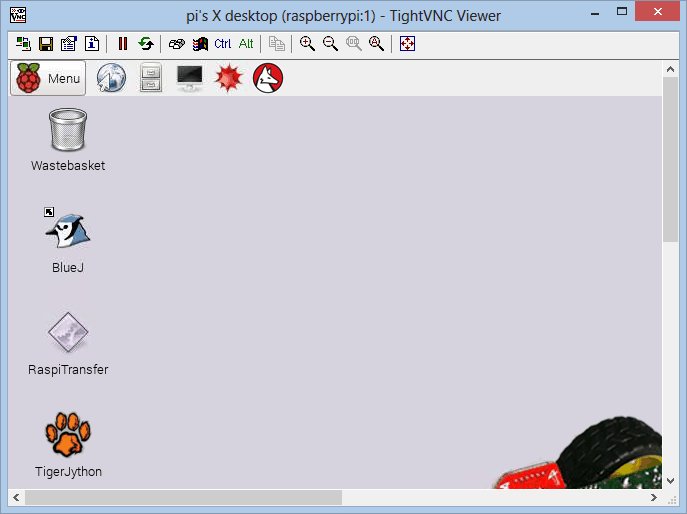
It's up to you what you want to do, but give a try to the TigerJython IDE and enjoy the simplicity of a Python turtle graphics program by running one of the Python scripts in the examples/02-Tu subfolder.
|
 LinkUp
 TCPCom
 Simulations