Java was our language of choice for many years for the advance computer science courses. We still highly recommend it in higher education and fortunately switching from Python to Java is rather straightforward due to a similar syntax. Both languages have a object oriented design, but with Python no class construction is needed and a global name space is available. With Java the programmer must construct classes right from the beginning and he/she should adopt a programming style typical for OOP. To avoid OOP by using static variables and methods is strongly disapproved.
Java programs access the RaspiBrick hardware through a Python based interface, the BrickGate TCP/IP server. Both when running on a remote PC or locally on the brick, the Java program sends commands to BrickGate that invokes the corresponding functions of the Python library. But this internal translation is hidden to the Java programmer. The only thing to do is starting the BrickGate server on the brick for remote and autonomous Java programs. Otherwise the programmer stays completely in the Java world.
The Java robotics API for the RaspiBrick is OOP based like with the former NXT and EV3. The concept remains the same, so Lego robots may be used side-by-side with RaspiBrick robots.
Robotics using any Java IDE
Java programs may be developed with any Java IDE (Eclipse, Netbeans, BlueJ, etc.) on a remote computer. Just download the RaspiJLib distribution and add RaspiJLib.jar to your external Java classpath. There is a clear distinction between remote and autonomous mode: In remote mode, the program is compiled and run on the remote computer that sends commands to the RaspiBrick robot via TCP/IP. In autonomous mode, the Java byte-code is packed into a JAR file that is transferred to the brick and executed under the Java Virtual Maschine (JVM) running on the Raspberry Pi. To facilitate the packing, transferring and executing of the program, we developed a Java utility called RaspiTransfer.

As you see, RaspiTransfer takes the location of the Java class files generated by your specific IDE, the main class (in order to know which class to use as entry point) and an arbitrary application name (the JARs file name). The JAR file is then transferred via SSH to the brick and may even be started there immediately without any intervention on the brick. (RaspiTransfer is part of the RaspiJLib distribution, but may also be downloaded here or execute it as WebStart.)
To start a program directly on the brick, it must be called MyApp (and reside in the /home/py/programs directory). When the BrickGate server is started, a single pushbutton click starts MyApp.jar in autonomous mode without any attached PC. Only one program (called MyApp.jar) can be started at this time.
If you have access to the Raspberry Pi via SSH or VNC, you may also start the downloaded program by executing
jrun <program-jar> <main-class>
RaspiJLib.jar is part of the RaspiBrick firmware distribution and the Java path to it is automatically appended when using the jrun command. Keep in mind that the BrickGate server must be up and running for all Java programs. You may stop and restart it via SSH or VNC using the commands rkill and rmon.
With VNC you may also use a Java IDE installed on the Raspberry Pi. We recommend the preinstalled BlueJ IDE because of its little overhead. To create an autonomous program packed in a JAR file, you can use the RaspiTransfer utility installed with the the RaspiBrick distribution.
A First Example
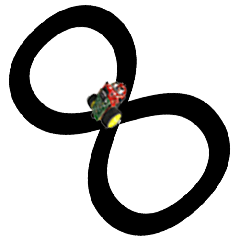
As example we present the classical line follower robot. If you have some prior knowledge of our robotics classes from our NXT or EV3 site, the code is self-explanatory. There is also an interesting web site of the Robotics Lab at PHBern where you find more information.
For the real robot, the track is normally created with colored paper. In simulation mode you create a track by loading a background image. Some of them are immediately available in the RaspiJLib distribution. Here the robot environment is called the context and you design it by calling methods of the RobotContext class. (To simplify the change from simulation to real mode, the RobotContext class is implemented with empty methods in the real robot libraries. So there is no need to remove the RobotContext lines or to comment them out when the program is run on the real robot,)
| import ch.aplu.raspisim.*; //import ch.aplu.raspi.*; public class PathFinder { public PathFinder() { Robot robot = new Robot(); Gear gear = new Gear(); InfraredSensor is1 = new InfraredSensor(InfraredSensor.IR_LINE_LEFT); InfraredSensor is2 = new InfraredSensor(InfraredSensor.IR_LINE_RIGHT); gear.setSpeed(30); gear.forward(); double r = 0.06; while (!robot.isEscapeHit()) { int v1 = is1.getValue(); int v2 = is2.getValue(); if (v1 == 0 && v2 == 0) gear.forward(); if (v1 == 0 && v2 == 1) gear.leftArc(r); if (v1 == 1 && v2 == 0) gear.rightArc(r); if (v1 == 1 && v2 == 1) gear.backward(); } robot.exit(); } public static void main(String[] args) { new PathFinder(); } // ------------------ Environment ---------------------- static { RobotContext.useBackground("sprites/track.gif"); } } |
 |
| Java Code | RobotContext |
Execute the simulation program locally using WebStart
The algorithm is evident: The values 0 and 1 of the infrared sensors pointing to the floor (reflected infrared light intensity below or above a threshold) determine if the robot moves straight forward or on a left or right arc. In remote and simulation mode, the Escape buttons corresponds to the Escape keyboard key. In autonomous mode, it is the RaspiBrick pushbutton. As you see, you are completely isolated from the low-level code to rotate motors and read infrared sensor values or GPIO port states.
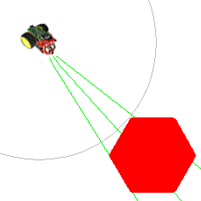
The next example shows the use of the ultrasonic sensor to work like a radar system to find a target and move the robot close to it.
|
import ch.aplu.raspisim.*; //import ch.aplu.raspi.*; import java.awt.Point; public class TargetFinder { private Robot robot = new Robot(); private Gear gear = new Gear(); private UltrasonicSensor us = new UltrasonicSensor(); private int left, right; public TargetFinder() { us.setBeamAreaColor("green"); us.setProximityCircleColor("lightgray"); gear.setSpeed(10); searchTarget(); gear.left((right - left) * 25); gear.forward(); while (!robot.isEscapeHit()) { double dist = us.getDistance(); if (dist <= 20) break; } robot.exit(); } private void searchTarget() { boolean found = false; int step = 0; while (!robot.isEscapeHit()) { gear.right(50); step = step + 1; double dist = us.getDistance(); if (dist != -1) { if (!found) { found = true; left = step; } } else { if (found) { right = step; break; } } } } public static void main(String[] args) { new TargetFinder(); } // ------------------ Environment -------------------------- static { Point[] mesh = { new Point(50, 0), new Point(25, 43), new Point(-25, 43), new Point(-50, 0), new Point(-25, -43), new Point(25, -43) }; RobotContext.useTarget("sprites/redtarget.gif", mesh, 400, 400); } } |
 |
| Java Code | RobotContext |
Execute the simulation program locally using WebStart
Collection of Examples:
Motor:
|
import ch.aplu.raspisim.*; //import ch.aplu.raspi.*; public class Motor1 { public Motor1() { Robot robot = new Robot(); Motor motL = new Motor(Motor.LEFT); Motor motR = new Motor(Motor.RIGHT); motL.forward(); motR.forward(); Tools.delay(2000); robot.exit(); } public static void main(String[] args) { new Motor1(); } } |
import ch.aplu.raspisim.*; //import ch.aplu.raspi.*; public class Motor2 { public Motor2() { Robot robot = new Robot(); Motor motL = new Motor(Motor.RIGHT); Motor motR = new Motor(Motor.LEFT); motL.forward(); motR.backward(); Tools.delay(2000); motR.setSpeed(20); motR.forward(); Tools.delay(2000); robot.exit(); } public static void main(String[] args) { new Motor2(); } } |
| Execute the simulation program using WebStart | Execute the simulation program using WebStart |
Gear:
|
import ch.aplu.raspisim.*; | import ch.aplu.raspisim.*; //import ch.aplu.raspi.*; publicclass Gear2 { public Gear2() { Robot robot =newRobot(); Gear gear =new Gear(); gear.setSpeed(60); gear.rightArc(0.15, 2000); gear.leftArc(0.15, 3600); robot.exit(); } publicstaticvoid main(String[] args) { new Gear2(); } } |
| Execute the simulation program using WebStart | Execute the simulation program using WebStart |
Button Control:
|
import ch.aplu.raspisim.*; |
import ch.aplu.raspisim.*; //import ch.aplu.raspi.*; public Button2() { Robot robot = new Robot(); Gear gear = new Gear(); while (!robot.isEscapeHit()) { if (robot.isUpHit()) gear.forward(); else if (robot.isDownHit()) gear.backward(); else if (robot.isLeftHit()) gear.leftArc(0.1); else if (robot.isRightHit()) gear.rightArc(0.1); else if (robot.isEnterHit()) gear.stop(); } robot.exit(); } public static void main(String[] args) { new Button2(); } } |
| Execute the simulation program using WebStart | Execute the simulation program using WebStart |
Infrared Sensor:
mport ch.aplu.raspisim.*; //import ch.aplu.raspi.*; public class Line1 { public Line1() { Robot robot = new Robot(); Gear gear = new Gear(); gear.setSpeed(30); InfraredSensor isL = | import ch.aplu.raspisim.*; //import ch.aplu.raspi.*; public class Infrared2 implements InfraredListener { private Gear gear; public Infrared2() { new Robot(); gear = new Gear(); InfraredSensor ir = new InfraredSensor(InfraredSensor.IR_CENTER); ir.addInfraredListener(this); gear.forward(); } public void activated(int id) { gear.backward(600); gear.left(550); gear.forward(); } public void passivated(int id) { } public static void main(String[] args) { new Infrared2(); } // ------------------ Environment ---------------------- static { RobotContext.useObstacle("sprites/bar0.gif", 250, 100); RobotContext.useObstacle("sprites/bar1.gif", 400, 250); RobotContext.useObstacle("sprites/bar2.gif", 250, 400); RobotContext.useObstacle("sprites/bar3.gif", 100, 250); } } |
| Execute the simulation program using WebStart | Execute the simulation program using WebStart |
Line Sensor:
import ch.aplu.raspisim.*; //import ch.aplu.raspi.*; public class Line1 { public Line1() { Robot robot = new Robot(); Gear gear = new Gear(); gear.setSpeed(30); InfraredSensor isL = new InfraredSensor(InfraredSensor.IR_LINE_LEFT); InfraredSensor isR = new InfraredSensor(InfraredSensor.IR_LINE_RIGHT); gear.forward(); while (!robot.isEscapeHit()) { int vL = isL.getValue(); int vR = isR.getValue(); if (vL == 0 || vR == 0) { gear.backward(1200); gear.left(550); gear.forward(); } } robot.exit(); } public static void main(String[] args) { new Line1(); } // ------------------ Environment ----------------- static { RobotContext.useBackground("sprites/circle.gif"); } } |
import ch.aplu.raspisim.*; //import ch.aplu.raspi.*; public class Line2 { public Line2() { Robot robot = new Robot(); Gear gear = new Gear(); gear.setSpeed(30); InfraredSensor isL = new InfraredSensor(InfraredSensor.IR_LINE_LEFT); InfraredSensor isR = new InfraredSensor(InfraredSensor.IR_LINE_RIGHT); gear.forward(); while (!robot.isEscapeHit()) { int vL = isL.getValue(); int vR = isR.getValue(); if (vL == 1 && vR == 0) gear.forward(); else if (vL == 1 && vR == 1) gear.rightArc(0.1); else if (vL == 0 && vR == 0) gear.leftArc(0.1); } robot.exit(); } public static void main(String[] args) { new Line2(); } // ------------------ Environment -------------- static { RobotContext.useBackground("sprites/border.gif"); RobotContext.setStartPosition(250, 490); } } |
| Execute the simulation program using WebStart | Execute the simulation program using WebStart |
Light Sensor:
import ch.aplu.raspisim.*; //import ch.aplu.raspi.*; public class Light1 { public Light1() { Robot robot = new Robot(); LightSensor lsL = new LightSensor(LightSensor.LS_FRONT_LEFT); LightSensor lsR = new LightSensor(LightSensor.LS_FRONT_RIGHT); while (!robot.isEscapeHit()) { int vL = lsL.getValue(); int vR = lsR.getValue(); showValues(vL, vR); Tools.delay(100); } robot.exit(); } private void showValues(int v1, int v2) { RobotContext. setStatusText("Drag torch! Light intensity" + "front left: " + v1 + ", front right: " + v2); } public static void main(String[] args) { new Light1(); } // ------------------ Environment ------------------ static { RobotContext.useTorch(1, 150, 250, 100); RobotContext.showStatusBar(20); } } |
import ch.aplu.raspisim.*; //import ch.aplu.raspi.*; public class Light1 { public Light1() { Robot robot = new Robot(); LightSensor lsL = new LightSensor(LightSensor.LS_FRONT_LEFT); LightSensor lsR = new LightSensor(LightSensor.LS_FRONT_RIGHT); while (!robot.isEscapeHit()) { int vL = lsL.getValue(); int vR = lsR.getValue(); showValues(vL, vR); Tools.delay(100); } robot.exit(); } private void showValues(int v1, int v2) { RobotContext. setStatusText("Drag torch! Light intensity" + "front left: " + v1 + ", front right: " + v2); } public static void main(String[] args) { new Light1(); } // ------------------ Environment -------------- static { RobotContext.useTorch(1, 150, 250, 100); RobotContext.showStatusBar(20); } } |
| Execute the simulation program using WebStart | Execute the simulation program using WebStart |
LEDs:
from raspisim import * #from raspibrik import * |
from raspisim import * #from raspibrik import * |
| Execute the simulation program using WebStart | Execute the simulation program using WebStart |
Camera, Servo Motor:
|