App Development Environments
For the beginner and occasional programmer full of enthusiasm, much frustration comes from the struggling with the installation and use of the programming development environment (IDE). It is our aim to help you to create your Android apps smoothly so you can concentrate on Java programming.
1 Developing on a desktop computer
Despite this is the standard procedure for professional programmers, is is also the hardest to mature. If you decide for this way, please study the full installation guide (link Installation and Use in the right column). In short, the installation requires the the following steps:
- Installation of the Java JDK (Java Development Kit)
- Installation of the Android SDK
- Creating a virtual device (emulator) using the Android-SDK manager
- Installation of a standard Java IDE (preferable Eclipse or Netbeans, others may be used with additional effort)
- Installation of the Android-Plugin in the Java IDE (if available)
- Download of the JTurteLib distribution. Extraction of the JTurtleLib.jar
- Download and installation of the ProjectBuilder for Java SE
This is how an Android app is created:
- In your Java IDE, create a new project. In Eclipse or Netbeans select a project of type 'Android',
if you don't have an Android plugin in your IDE, you must adapt your project by running a command line tool 'android' found in the Android SDK
- Add the external library JTurtelLib.jar to the project
- Run ProjectBuilder to prepare your project to be used with JTurtleLib
- Write the source code for your app (one or several classes in one or several files)
- Build the app. This will run an ant script created by your Android plugin. (If you don't have a plugin you must install ant and run the script by hand). The ant script will do all necessary steps for you:
- Creating the resource information class R.java
- Compiling all Java sources to Java binaries using the standard javac compiler
- Translating Java binaries to Dalvik binaries
- Packing binaries, Manifest and resources into an application APK file
- Signing the APK with a debug signature
- Download and install the APK file on your running emulator or attached Android device (the Android plugin will do it automatically)
2 Developing with our Online-Editor/Compiler
As you saw above, the creation process, starting from the Java source to the running Android app, is by no way trivial. Why not completely hide all intermediate steps by an online development system? We took this challenge as a project goal for our online development system, called Online-Editor/Compiler. Creating JTurtleLib and JDroidLib applications is now a one-click process, because all steps are transparent to the user and most of them executed on our Web server in a personal webspace. For running the app on a desktop emulator or download it to an attached Android device, some few local installations are necessary, but they are done without user intervention in subdirectories of the user home directory. Because no administrator rights are needed, the system can also be used in a protected computer pool environment. The access to the server is completely free, no account creation is required.
Moreover we present Java tutorials in English and German (see also http://www.java-online.ch), committed to the paradigm of "Learning by Examples", where we publish fully functional source code that is automatically pasted into the online editor where it can be compiled/built/reengineered in a one-click action.
Let's see how it works. First visit the Android Turtle Graphics website at http://www.aplu.ch/jturtlelib.
| Here you find: |
 |
Click Open source in Online-Compiler (you may do it from here) and a window with the source code opens. (You need the latest version of JRE.)
Click Compile.
| You find: |
 |
The complete build process has been executed on our server and the application APK is ready for you in your personal webspace. You may now proceed by clicking:
- Run: The APK is downloaded/installed/executed on the waiting Android emulator or USB attached device
- Save: The APK is downloaded to your computer to be installed by hand on your Android device
- Install with QR code: A QR code image with the link to your APK is displayed and you may download and install it using a smartphone QR code reader
- Install via Bluetooth: A Bluetooth transfer program is started and the APK is transferred to the Android device via our DroidInstall Bluetooth server app (download app from here)
If you don't have a smartphone at hand or just want to see how it works, click start the emulator and then Run. (Use the helper link to get informed how to install the emulator.)
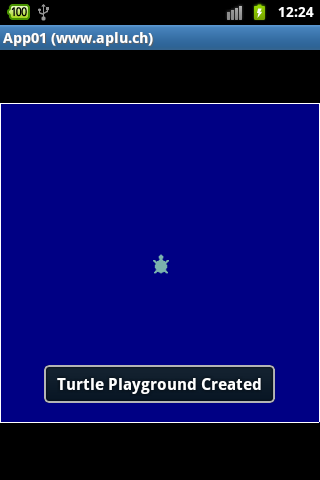
| After a while you see the result: |
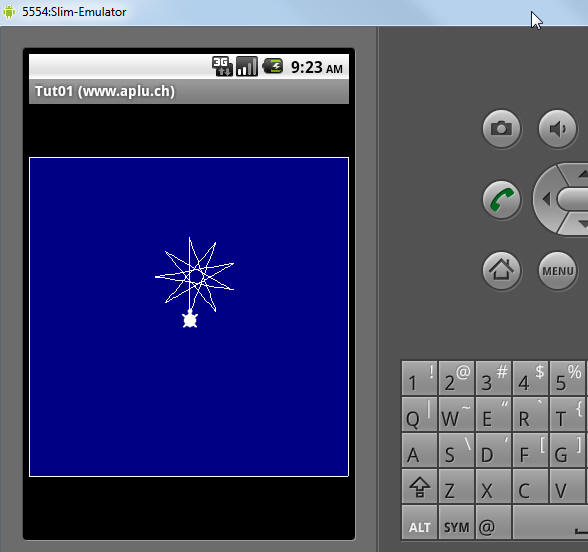 |
If you think, it's just a miracle, modify the source code, e.g. by changing the turtle's turn angle from 160 to 120 degrees and click Compile and Run (without closing the running emulator).
If you attach your smartphone to the USB port, you must have the USB driver installed on your computer and the USB-debugging option selected on your smartphone. The driver normally installs with the propriety synch application (Samsung Kies, HTC Sync or the like).
3 Developing on an Android tablet/big screen-sized smartphone
Android devices are full-featured computers running Linux. It is tempting to port part of the Eclipse IDE and Android SDK to the mobile device, so Android apps can be developped on the same device you run it. The product of our choice is AIDE, but other apps with similar features will emerge or can already be found on the Android market.
The installation of a Android development environment based on AIDE is straightforward and takes a minute or two. Download and install two apps, AIDE and ProjectBuilder, and you are ready to go. Because the JDroidLib and JTurtleLib libraries are built into the ProjectBuilder app, you should always upgrade to the latest version. Let's show step-by-step how to proceed (see here for another user guide):
- Download and install the latest version of AIDE from the Google Play Store.
- (Optional) Download and install a file explorer from Google Play Store (e.g. File Expert). This simplifies managing folders and files.
- Download and install the latest version of ProjectBuilder using the link in the right border area of this website. (You may also download it from Google Play with keyword ProjectBuilder.)
|
-
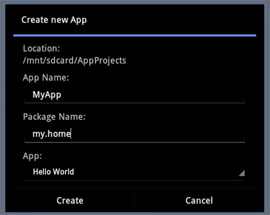
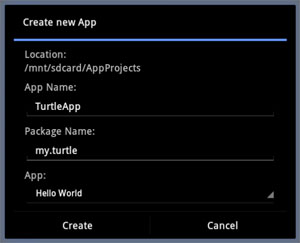
Start the AIDE app and create a project. You may enter a short package name, but at least one dot is required. (The App and Package Name entry is of no importance, because it is modified by ProjectBuilder.) Press Create. Press Home to quit AIDE.
|
 |
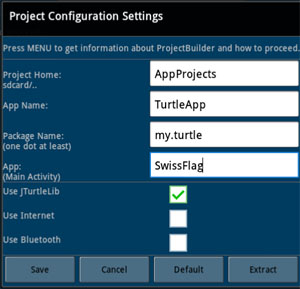
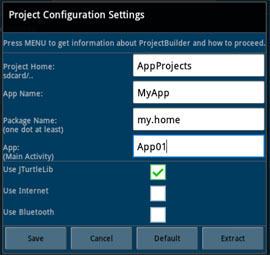
- Start the ProjectBuilder app. Fill out the form. Don't forget to check the Use JTurtleLib check box. Press Save and then Home to quit the ProjectBuilder
|
 |
-
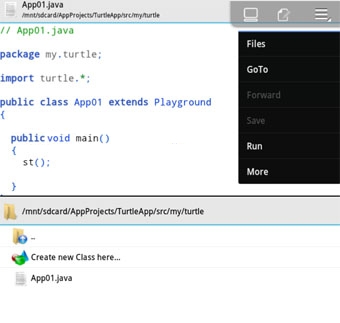
Restart AIDE and navigate to the source folder /mnt/sdcard/AppProjects/TurtleApp/src/my/turtle. Here you find App01.java and MainActivity.java, the two Java source files. (You may delete MainActivity.java with a long press, because it is never used.)
You can inspect the content of the Java source file App01.java created from ProjectBuilder's source template.
|
 |
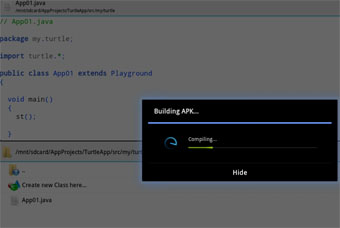
-
The AIDE Building APK dialog opens and you may observe the sequence: Compiling..., Dexing..., Building APK..., Signing... . Then the usual APK installation process starts.
|
 |
-
When you finally press the Open button, your new turtle app starts.
You may add some more interesting method calls from the JTurtleLib classes and play around with your new turtle gadget.
We also suggest to explore the project file system and have a look in AndroidManifest.xml found in the project root and the resource layout file main.xml found in folder res/layout.
|
 |
How to import example code from our tutorials:
When you work through our online tutorials, you will encounter many examples ready to be compiled and executed. To simplify the import of the source code (and for JDroidLib the sprite images) into your AIDE project, you proceed as follows:
-
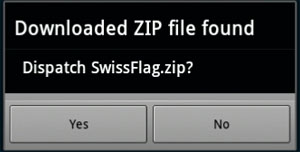
Use a standard Android web browser to work through the examples. When you are interested to import one of the examples, tap the link with the ZIP archive. The file will be downloaded by the browser into the standard download folder on the sdcard memory. Remember the file name of the file. Try it right now with this link:
 |
source (SwissFlag.zip). |
|
|
|
-
Start the AIDE app and create a project as explained above. If the project was already created before, skip this step.
Keep in mind that apps are identified by the package name. If you enter a package name already used before, the older app will be replaced by the new one. You may change the package name to keep the older app and ProjectBuilder automatically modifies the package statement in the source files accordingly and a new package subfolder structure is created.
|
 |
(Continued in Tutorial 2)
|