RaspiBrick Firmware Installation
Preliminary:
We recommend to use our preconfigured SD-card image that is created by applying the manual procedure described later on. This is most easy for you because you do not have to connect any external devices (screen/keyboard/mouse) to your Raspberry Pi.
If you are interested to know how the card image is created or if you want to learn how to configure a Raspberry Pi operating system from scratch, you can follow the manual installation procedure. In this case you have to connect a HDMI monitor (or a VGA monitor connected via a HDMI-to-VGA adapter), and a USB keyboard/mouse.
Installation with preconfigured SD-card image
- Download the zipped image raspibrick.zip from here. The size is about 2.4 GB, so be patient.
- Unpack it in any directory (using an unpacker utility that supports large files, like WinRAR).
- Insert a micro SD-card of at least 16 GB size (class 10 ultra, recommended).
- Launch a tool to copy img files to SD-cards. (We recommend USBImageTool under Windows or ddutility under MacOS/Linux.)
Be careful to select the SD-card drive, otherwise you may destroy data on a wrong drive.
-
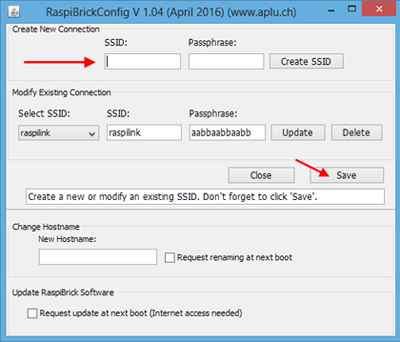
In order to connect the Raspberry Pi to a WLAN router (hotspot), it has to know the SSID and the passphrase (password) of your router. These WLAN log-in information can be entered by starting our configuration tool
RaspiBrickConfig.jar
found on the small FAT32 partition of the SD-card. Because it is a Java program, you need a computer with an installed JRE (Java Runtime Environment). Normally you can double-click RaspiBrickConfig.jar to launch it. If this fails, enter a shell (console) and go to the SD-card drive/folder. Type java -jar RaspiBrickConfig.jar to launch the utility.
- In the dialog box enter your router SSID and the passphrase.
Then click Create SSID and Save.
|
|
|
The SD-card is now ready to be used in your Raspberry Pi. Insert it now and apply power. Because some useful information are shown with LEDs and the 7-segment display, it is recommended that the Raspberry Pi is already mounted on the Pi2Go hardware. The first boot process takes a bit longer because some initializing processes are executed. Consult the RaspiBrick firmware information.
Manual installation starting from Raspberry Pi NOOBS distribution
(you do not need the Pi2Go hardware to create the SD-card)
- Connect a monitor/keyboard/mouse to the Raspberry Pi
- Insert a Raspberry Pi compatible USB WLAN adapter (e.g. Edimax EW 7811UN, not needed for Raspberry Pi 3 )
- Make sure you have access to a WLAN router (hotspot, access point) with the security protocol WPA2-PSK (Personal) that is connected to the Internet. You have to know the SSID and the passphrase (password, security key).
- Provide an empty micro SD-card with minimum 8 GB size (type 10 ultra recommended). The card must be FAT32 formatted. New cards are normally preformatted. If you must format the card, use SD-Formatter.
- Download the NOOBS distribution from www.raspberrypi.org/downloads and unpack it. Copy all files and subdirectories to the SD-card.
- Insert the card in the Raspberry Pi and power it.
- In the install menu select ✔ Raspbian and ✔ Datapartition . At the bottom line choose the language and keyboard you want to use. Click Install and confirm that all data is going to be lost.
- After the installation process that lasts a while, the Raspberry Pi is automatically rebooted and the GUI desktop started.
Open the WLAN setup by clicking the WLAN symbol in the title bar. Enter the SSID and the security key of your router/access point. The router's DHCP server provides now an IP address. To find it out, you can move the mouse pointer on the WLAN icon and a small window will open. You may also start a terminal (icon in the title bar) and type ifconfig. The IP address is shown in the wlan0 section. Write down the address.
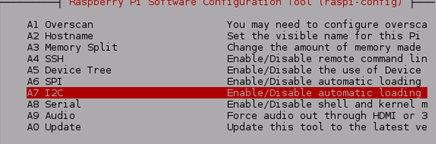
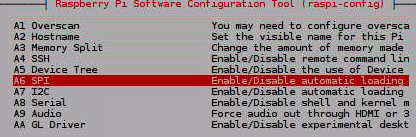
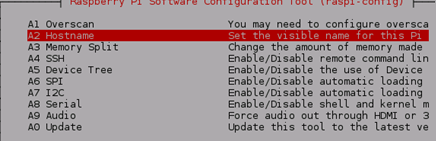
- Open a terminal and type sudo raspi-config. Make the following setups using the keyboard (no mouse support, use TAB to move from one field to another):
| |
1) Advanced Options: Enable I2C

2) Advanced Options: Enable SPI
3) Advanced Options: Select hostname (any name you remember)
4) Enable Camera
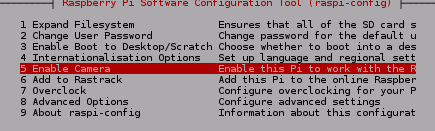
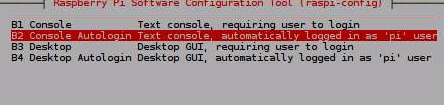
5) Select Boot Options: Console Autologin
(this accelerates the boot process)
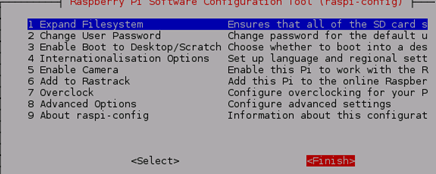
6) Select Finish
The Raspberry Pi boots now and you are logged-in as
user: pi
password: raspberry (make sure that your keyboard does not exchange the 'y' and 'z' keys. Try it out at the user request line.)
|
The basic setup is now finished and you install additional software components. Keep in mind that your Raspberry Pi must have Internet access through the WLAN router (or the Ethernet port). You may remain in the boot console or use the Desktop view.
- In Desktop view open a terminal (console) by clicking the icon in the title bar. Enter the following commands (terminate with Enter/Return, cancel with Ctrl-C):
- As an option you can install a virtual desktop server (VNC) to get access to the Raspberry Pi OS from a remote PC through TCP/IP to get around a monitor/keyboard/mouse attached to the Raspi. Proceed as follows:
| |
In Desktop view open a terminal (console) by clicking the icon in the title bar. Enter the following commands (terminate with Enter/Return, cancel with Ctrl-C):
chmod +x install/install-vnc
./install/install-vnc (do not forget prefix dot)
During the installation you are requested to select a password that is used to idenfity the client. It should have at least 6 characters, e.g. 123456. Reboot the Raspberry Pi now.
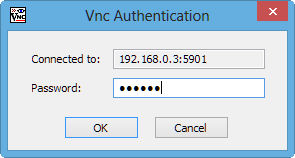
To access the VNC server from your PC you install a VNC client, e.g. TightVNC. Start it and enter the IP address for your Raspberry Pi followed by a colon and the port 5901:
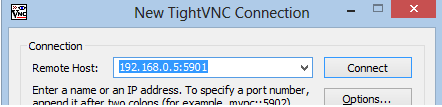
In the identification dialog enter your password (123456).
and the Linux desktop is shown.
|
- As an option you can install software for the camera support.
| |
In Desktop view open a terminal (console) by clicking the icon in the title bar. Enter the following commands (terminate with Enter/Return, cancel with Ctrl-C):
chmod +x install/install-cam
./install/install-cam (do not forget prefix dot) |
- As an option you can install the TigerJython IDE locally on the Raspberry Pi.
| |
In Desktop view open a terminal (console) by clicking the icon in the title bar. Enter the following commands (terminate with Enter/Return, cancel with Ctrl-C):
chmod +x install/install-tj
./install/install-tj (do not forget prefix dot) |


