MicroBit Remote Development
 
Buggy / Moving Robot
 

The source code of all examples can be downloaded from a link in the right side bar.

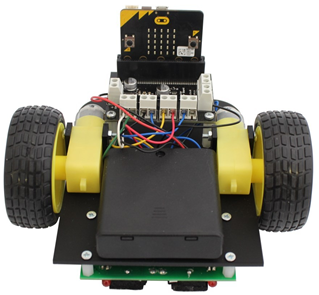
Moving robots are considered to be the prototype of robots, probably because it is more humanoid than other machines. Moreover self-driving robots are of great actuality because self-driving cars (and other vehicles like drones) will revolutionize mankind in the near future. The most elementary version of a self-driving car is a platform equipped with two electric motors and a caster wheel. Be activating the speed of the motors independently the vehicle can move forward, backward and turn.


green

Example 1: Turn motor on/off with digital output


Caution: Never connect a motor directly to the micro:bit pins.

You can not power a DC motor directly from a micro:bit output pin because of the current limitation (5 mA) and more important because a motor acts like a solenoid, so turning a motor off generates voltage spikes caused by induction that may damage the micro:bit.

Aim:
Connect a 3V DC motor to a transistor driver (see chapter Digital In/Out for more information) and turn the rotation on and off using write_digital().

Program:
# MotorDigital.py

from microbit import *
display.show('2')
pin0.write_digital(1)
sleep(2000)
pin0.write_digital(0)
sleep(2000)
display.show('1')
pin0.write_digital(1)
sleep(2000)
pin0.write_digital(0)
display.show('0')

Remarks:
Normally motors are not powered from the 3.3V supply of the micro:bit, but from an external 5 V supply (or higher voltages if required).


green

Example 2: Regulate motor speed with PWM


Aim:
Connect a 3V DC motor to a transistor amplifier (see chapter Digital In/Out for more information) and increase speed from 50% to 100% and back again endlessly.

Program:
# MotorPWM.py

from microbit import *

speed = 5
upward = True
while True:
    pin0.write_analog(speed * 100)
    display.show(str(speed))
    sleep(2000)
    if upward:
        speed += 1
        if speed == 9:
            upward = False
    else:
        speed -= 1
        if speed == 5:
            upward = True

Remarks:
Normally motors are not powered from the 3.3V supply of the microbit, but from an external 5 V supply (or higher voltages if required).


All the following examples require the Kitronik buggy chassis and the corresponding motor driver and line follower boards.
microbit23


Based on the principle to drive a motor as shown in the previous examples a small library module mbutils.py is written that is downloaded to the micro:bit's file system from the MBM distribution when the micro:bit is flashed. The current version can be downloaded from here. Reference code (may not be up-to-date):
# mbutils.java
# V1.0, Aug. 2017

from microbit import *

###  motors/buggy
motL = (pin16, pin0)
motR = (pin8, pin12)
bspeed = 40

def mot_rot(mot, speed):
    if speed > 0:
        mot[0].write_analog(10 * speed)
        mot[1].write_digital(0)
    elif speed < 0:
        mot[0].write_digital(0)
        mot[1].write_analog(-10 * speed)
    else:
        mot[0].write_digital(0)
        mot[1].write_digital(0)

def buggy_setSpeed(speed):
    global bspeed
    bspeed = speed
    
def buggy_forward():
    mot_rot(motL, bspeed)
    mot_rot(motR, bspeed)
def buggy_backward():
    mot_rot(motL, -bspeed)
    mot_rot(motR, -bspeed)

def buggy_stop():
    mot_rot(motL, 0)
    mot_rot(motR, 0)   

def buggy_left():
    mot_rot(motL, 0)
    mot_rot(motR, bspeed)

def buggy_right():
    mot_rot(motL, bspeed)
    mot_rot(motR, 0)

def buggy_leftArc(reduce):    
    mot_rot(motL, bspeed)
    mot_rot(motR, int(bspeed * reduce))

def buggy_rightArc(reduce):            
    mot_rot(motL, int(bspeed * reduce))
    mot_rot(motR, bspeed)

### Line Follower
ldrL = pin2
ldrR = pin1

def isDark(ldr):
    return (ldr.read_analog() > 100)


green

Example 3: Moving the buggy

 
Aim:
Move the buggy forward, stop it and move it back each cycle for 2 s. Then stop it
Aim:
Increase speed by clicking the A button. Decrease speed by clicking the B button.
# Gear1.java
# forward/stop/backward

from mbutils import *

buggy_forward()
sleep(2000)
buggy_stop()
sleep(2000)
buggy_backward()
sleep(2000)
buggy_stop()
# Gear2.java
# Change speed

from mbutils import *

speed = 0
display.show("0")
while True:
    if button_b.was_pressed():
        if speed < 100:
            speed += 10
            buggy_setSpeed(speed)
            display.show(str(speed // 10))
            buggy_forward()
    if button_a.was_pressed():
        if speed > -100:
            speed -= 10
            buggy_setSpeed(speed)
            display.show(str(speed // 10))
            buggy_forward()
    sleep(10)   


Aim:
Turn the buggy left and right
Aim:
Move buggy on left and right arc
# Gear3.java
# Turn left/right

from mbutils import *
 
buggy_left()
sleep(2000)
buggy_right()
sleep(2000)
buggy_stop()
# Gear4.java
# Turn on left and right arc

from mbutils import *

buggy_leftArc(0.3)
sleep(2000)
buggy_stop()
sleep(2000)
buggy_rightArc(0.3)
sleep(2000)
buggy_stop()


green

Example 4: Line follower

 
Aim:
Print values returned from line follower sensors.
Aim:
Define function to detect dark/bright state.
# Line1.java
# Check sensor values

from microbit import *

ldrL = pin2
ldrR = pin1

ldr = ldrL
while not button_b.was_pressed():
    value = ldr.read_analog()
    print(value)
    sleep(500)
 
# Line2.java
# Define your own function

from microbit import *

ldrL = pin2
ldrR = pin1

def isDark(ldr):
    return (ldr.read_analog() > 100)

ldr = ldrL
while not button_b.was_pressed():
    value = isDark(ldr)
    print(value)
    sleep(500)


Aim:
Use a function from the mbutil module.
Aim:
Finally put all together and enjoy the simplicity of the code.
# Line3.java
# Use library function

from mbutils import *

ldr = ldrL
while True:
    value = isDark(ldr)
    print(value)
    sleep(500)
 
# line4.py
# Line Follower

from mbutils import *

while not button_b.was_pressed():
    if isDark(ldrL) and isDark(ldrR):
        buggy_forward()
        display.show("F")
    elif isDark(ldrL) and not isDark(ldrR):
        buggy_left()   
        display.show("L")
    elif not isDark(ldrL) and isDark(ldrR):
        buggy_right()
        display.show("R")
    else:
        buggy_right()
        display.show("R")
    sleep(10)
buggy_stop()
display.show("S")


green

Example 5: Remote control


Aim:
Use Bluetooth communication between two micro:bits to create a remote control system. Depending on the forward/backward/left/right tilt of the controller, the buggy performs the corresponding movements.

The command strings FORWARD, BACKWARD, LEFT, RIGHT, STOP are sent from the remote controller to the buggy, where they are interpreted and translated into the corresponding action.

The first letter of the current state is shown on the buggy's dot matrix display. A state variable is used to ensure that only state changes are reported.

Enjoy!

Program running on Buggy Program running on Controller
# RemoteBuggy.py

from microbit import *
from mbutils import *
import radio

radio.on()

display.show(Image.YES)
while not button_b.was_pressed():
    rec = radio.receive()
    if rec != None:
        display.show(rec[0])
    if rec == "FORWARD":
        buggy_forward()
    elif rec == "BACKWARD":
        buggy_backward() 
    elif rec == "LEFT":
        buggy_left() 
    elif rec == "RIGHT":
        buggy_right() 
    elif rec == "STOP":
        buggy_stop() 
    sleep(10)
buggy_stop()    
display.show(Image.NO)
# RemoteControl.py

import radio
from microbit import *

radio.on()

state = "STOP"
oldState = ""
while not button_b.was_pressed():
    acc_x = accelerometer.get_x()
    acc_y = accelerometer.get_y()
    if acc_y < -800 and state != "FORWARD":
        state = "FORWARD"
    elif acc_y > 800 and state != "BACKWARD":
        state = "BACKWARD"
    elif acc_x < -800 and state != "LEFT":
        state = "LEFT"
    elif acc_x > 800 and state != "RIGHT":
        state = "RIGHT"
    elif acc_x > -100 and acc_x < 100 and \
         acc_y > -100 and acc_y < 100 and \
         state != "STOP":
        state = "STOP" 
    if oldState != state:
        radio.send(state)
        display.show(state[0])
        oldState = state    
    sleep(10)
radio.send("STOP")    
display.show(Image.NO)